Saturday, December 23, 2023

Continuing the navy blues in Simplicity 9018

As the weather turned cooler this year, a shortage of long sleeve knit shirts in my closet became noticeable.  That meant a look at the fabrics and patterns I have accumulated.   Simplicity 9018 provided a mock turtleneck top, a look that is trending this fall.  The pattern has simple, casual separates for knit fabrics.   A recent addition to my fabric collection is 2 yards of Art Gallery Fabrics Gentle Draft Knit in Moonrise, 95% cotton, 5% spandex, 58" wide.  This came from  the Confident Stitch in Montana at a price of $37.80.    Pattern calls for 1 5/8 yards for the long sleeve top.  This version was cut on the medium size, grading to the large just above the waist.  There was about 3/4 of a yard of fabric remaining. 

The size lines are not marked on the left side of the neck piece.  Before I realized this, I cut along the line that is near the small dot for the size M.  This makes it 7/8" too short.  A narrower seam left it only 3/8" too short.  It is actually a nice fit, requiring just a little easing required to sew it to the neckline.


It is all sewn with a stretch stitch (lighting stitch, i.e. it looks like lightning bolts) on a tiny BP needle with less pressure--all because this fabric is very cushy and stretchy.   In the end, I resorted to the walking foot to get a smooth seam.  The regular foot stretched the fabric and made the seam ruffle.


Using a 3/8" seam allowance on the sides provided even more ease, but it was necessary to grade to a 5/8" allowance at the armholes so the sleeves fit.  
The sleeves went in well.  The hem length is per pattern.  It is hemmed with a wavy stitch, to match the print in fabric.  This stitch stretches better than plain top stitching and is inspired by quilting bloggers, who often match the stitch to the print.

Saturday, December 9, 2023

Score! The 1977 Vintage Jacket Idea is Revived

On a spur-of-the-moment browse through a local sewing machine shop, I found some really good cotton for the second version of the jacket that I couldn't complete with the railroad twill. Now it will have railroad twill trim. The main fabric is a deep navy blue, with a texture a bit similar to a pique. It's 100% cotton, 56" wide. I bought the 1 1/2 yards left on the end of the bolt. Although I usually try to avoid the bolt ends because they often have wrinkles that won't come out, this cotton washed out smooth.


I have made this pattern once before, out of leftover fabric. For that first trial, there was not enough to make the pockets. Thus, the pockets for this pattern are a first time make. After a couple of mock-ups, I worked out how to attach the bias binding and reduce the bulk at the corners where the pocket will be top-stitched to the jacket. The railroad twill is heavy fabric, so top-stitching through multiple layers of twill and the textured cotton would have been difficult. I opted to hand sew the binding to the jacket at the pocket edges. I also finessed the edges of the binding by folding it over and stitching it right sides together before sewing the binding down by hand on the wrong side. I found that trimming the main fabric away from this seam at the corners reduced the bulk.


Most of the construction went smoothly according to the detailed vintage pattern instructions, which I found very helpful. The corners of the front yoke are reinforced with a bias square where it joins the front placket. The body is gathered and attached to the yokes for both the front and the back. The shoulders and side seams are sewn together. The hem is blind hemmed, but with the dark fabric, a topstitched hem was hardly visible. The collar pieces are attached to the jacket and to the facing and the jacket and facing are basted together before binding. Button loops are attached to the front and hand sewn to the facing after the binding is applied to the fronts. The pockets are constructed and sewn on. Finally, the cuff and sleeves are sewn together and sewn to the body. Prior to all this sewing however, came my only mistake, resulting in the interfacing being fused to the wrong piece. Oops.

Placket interfaced correctly in first jacket
That's right (i.e.wrong). I fused the interfacing to the facing rather than the jacket. I did it correctly the first time I followed this pattern, but not this time. The interfacing should be attached to the jacket over the placket seam. Since I did not think it would hold in place with the fusing to the seam, I fused it neatly to the facing, forgetting to check my first version. The old instructions call for a sewn in interfacing which would probably be better for this jacket. However, I wanted to use some black fusible interfacing I bought on a whim when interfacing was on sale. I didn't think I would have another project that would use this interfacing since it is very heavy, even though it is labeled feather weight. I have had fusible interfacing bubble after washing on other projects.

Facing interfaced, placket bare in second jacket
I reasoned that attaching it to the facing would hide any bubbling. Once I realized what I had done wrong, I followed through and used the interfaced collar piece as the facing. Now that it is all constructed, I can't see that it made any difference in the fit or drape of the jacket.

Finished Placket

The sleeves are also a first make, since the original version has long sleeves.  The short sleeve pieces were missing from the first pattern (a size 14) I purchased. This version uses the short sleeve pattern pieces from a size 12 pattern. There's a small difference in the fit, but not enough to warrant an adjustment. The contrast on the short sleeve is actually a lining on the inside hem. After it is sewn on, a cuff is turned up to allow the contrasting fabric to show. It would have a smoother appearance if the trim was sewn to the outside of the sleeve. The advantage to the contrast lining is that it offers choices on the depth of the cuff and even to not have a cuff.

Sleeve Cuff

There's a lot of details, hand sewing and facing in this rather casual jacket. It is probably not something I will make often, but it has a very cute vintage appeal, especially with the short sleeves, quirky pockets and toggle buttons. It was gratifying to be able to use the buttons from the Netherlands since the binding has an off-white background.


That's a final look at the vintage jacket. It's part of a complete coordinating set, with t-shirt and skirt. In navy blue, it works with a few other items I have sewn. I have one other piece of navy fabric to use. It will be up next.

Saturday, November 18, 2023

The Florence Shirt by Jalie, a troublesome toile

It seemed like it would be fun to sew up a shirt in a paneled print, playing with the print, placing a stripe here, a rectangle there.  However, this wonderful slinky rayon crepe was a nightmare to cut, only somewhat manageable with a rotary cutter on a single layer.   Luckily, it was easy to sew and a dream to wear.  It does seem a bit crinkly, so it might stretch out with washing and wearing, as crinkle rayons do.  

The 6 24" panels of Dark Navy/Camel/Pearl White/Multi 100% Rayon Diamond Framework Print Challis, 56" wide, were $24, bought from Fabric Mart for McCall's 7650. That pattern lists rayon challis.  However, this is more of a rayon crepe.  It would work for that pattern, but I was discouraged from making that dress by some pattern reviews.  The dress back has no structure to support a drapey rayon fabric.  

Florence Shirt by Jalie in Rayon 

The Florence Shirt has structure in its collar, back yoke and plackets.  For further support, the pocket instructions prompted me to interface the pocket hem as well as the usual interfacing on the collar and plackets.  As additional support, bias binding was added to the pocket hem, plackets and shoulders.  There won't be any unraveling there.  The neck and sleeve edges have bands that enclose the seam allowances.  At least, the collar is intended to enclose the allowance, the sleeve bands are not.  However, it was a simple mod to turn the band seam allowance down and stitch in the ditch to secure it over the sleeve seam allowance.  The side seams were pinked and pressed open.  French seams would have been better there, but there's not enough seam allowance for that.

The 3/8" seam allowance is the start of my issues with the Jalie pattern format.  A 3/8" allowance is good for knits because it saves a bit of fabric and the trouble of trimming.  With woven fabrics, edge treatments, either French seams, Hong Kong finishes, or overcast edges, are often needed.  A 5/8" seam allowance is essential for these finishes.  Additionally, because the pattern is intended to be traced off, the paper is too thick for cutting.  The instructions are clear and helpful.  Some minor steps are omitted, such as seam finishes, pressing directions, etc.   For example, the buttonholes are not marked on the pattern piece.  A chart is provided for button placement for the dress option.  If there is one for the shirt, it is lost now.  (The buttonhole layout is my own, I explain below.)   For those who like to trace patterns to save the original, don't mind a narrow seam allowance, and never refer to instructions, the format is good.  The design is great and overcomes the pattern's shortfalls.

The construction is easy to understand.  Assembly went as directed, with only one mistake on my part--attaching the collar in reverse of the instructions.  The instructions are to sew the inner collar facing onto the shirt, then top stitch down the collar on the right side.  Instead, I sewed the right side of the collar down, then top stitched the collar, catching the facing in the top stitching.  As a result, I had to hand sew down a portion of the collar that did not get caught in the top stitching.  The instructed method would have been easier.  

3/8" buttons
(The diagonals are part of the pockets!)

In spite of a vague memory of a chart for button placement for the shirt, I could only find one for the dress.  Even though the dress button placement chart was helpful, there's fewer buttons on the shirt.  With my placement, there are fewer buttons than recommended for the shirt.  However, that is not the only buttonhole problem.  Even after realizing that the buttons are to be sewn horizontally for the collar and vertically for the band, I still forgot and sewed them all horizontally.  It seemed the correct way because the buttonholes for my Vogue top are vertical and the buttons make them gape out around the thread shank.  That could be caused by the 4-hole buttons, but also by the direction of the slide.  These are two-hole buttons.  It just seems to me that for the horizontal shank created by the two-hole button, it is better to allow the button to slide to the end of the buttonhole where it naturally wants to sit.  There is a round-ended buttonhole style in my machine that is recommended for lightweight fabrics.  These would be an option for a repeat of this pattern.  Will there be a repeat?  Look:  

On the end result, wow.  The drape, the fit, the back pleat, are all winners.  Both the plackets and the collar are smooth and a perfect fit.  Truly the only detraction is the print.  The print of the fabric is busy.  The pockets are of questionable use and my decision to bias cut them and place the largest design across the diagonal was overkill.  Nonetheless, the pockets are striking and may add more to the shirt than I realize.  They are definitely a wow.  But a wow that I need to become comfortable with.  The back is fabulous enough to compensate for the overwhelming pockets.  Not bad for a toile, especially one that used only half of the fabric.

p.s. Those are the pants from my last post.

Wednesday, November 15, 2023

I Dare Pants with New Look 6458


I have not worn pants for a few years now.  I just gave them up once I deemed jeans were no longer comfortable.  True, I did buy a couple of pairs of cotton cropped trousers when they first came into fashion.  They hang in my closet still because I successfully upcycled a pair of double-gauze capris into a skirt when upcycling was how I sewed.  I keep thinking I will upcycle the trousers into skirts, but pause when I remember that upcycling is more work than cutting and sewing.  After all, the garment has to be almost completely taken apart before the cutting and sewing starts.  That is an extra step.  It might be good for the planet if the end result is wearable, but wearability is more of a risk when there is no pattern to follow.  

Once I dropped upcycling, I started buying fabric and patterns, concentrating on the main gap in my wardrobe--skirts.  Since my entire wardrobe was built around blue jeans and tops, the economical approach was to add skirts.  I tried to by skirts but found it difficult.  A case in point were the 3  hours I spent at a San Francisco area outlet mall that yielded only two skirts, both gray.  I figured if I can't find skirts in any store in a big city mall, skirts are just not available.  After that, I began upcycling jeans into skirts and fell into sewing full tilt during the lockdown.  Now, I have a fairly full closet.  (Which is why there's been no sewing since June.)  However, there are no pants in it.  At least, none that I wear.  With cold weather approaching, I dared to try sewing a pair of warm, comfy pants. 

My wearable toile used 3 yards Prussian Blue Poly/Lycra brushed sweater knit.  ($3/yd., 58" wide. $9 FM)  The only pants pattern I have for knit fabric came with one of my most-used basic skirt, top and dress patterns, New Look 6458.  Since I have used this pattern repeatedly, I felt confident with a size 16.  A size 14 would be a more flattering fit, but these should be comfy, not cute.  Well, cute won't hurt, but a brushed "sweater" knit does not promise a flattering fit.  If I like these and wear them, there's other knits in my stash that can be cut to a size 14.  

Once cut, there were no markings to be transferred.  The pieces went together in less than an hour, even with the oh-so slow stretch stitch.  For the waistband and hems, there was a heavy ribbed knit fabric from JA, 1 yard Cream athleisure rib, 43", 90% nylon/10% spandex, $10.46.  The cuffs and waistband used less than 5", call it $2, for a total of $12.50 or so.  Although the ribbing is labeled machine wash gentle cold, tumble dry low, the brushed poly knit is gentle wash.  I washed them in cold water, shorter cycle and hung to dry.  There's no agitator in my top loader so it is gentle enough.  

My new stretch twin needle performed well as long as there was the stiffer ribbing under the needle in the mix somewhere to reduce the tunneling.  The hems are twin needled, but the less visible waistband was attached with a stretch zig-zag stitch.  The three layers of the seam allowances were stitched together with the same in an effort to keep them turned in the proper direction--down for the waistband, up for the hems.  

All in all, a neat and comfortable finish.  Matching the ribbing color to the main fabric would dress it up a bit, but this one is fine for these casual pants.  


Here is a flat lay for now, there will be another photo of these pants when the coordinating shirt is done.

Thursday, June 29, 2023

McCalls 8053 as a summer tunic

My inspiration:


These are the pattern photos for the Tosca tunic by Tessuti.

My fabric:

Crinkle Gauze, rayon/cotton, sheer, yarn dyed woven plaid large checks in black on white. 44" 4 yards, $7.99 reg, $2/yard on sale, $8 total. 

My pattern:

McCall's 8053, a simple straight dress with short sleeves.  It has darts, which the Tosca does not have. The sleeve piece from my recent vintage jacket pattern was used to lengthen the pattern's sleeves.

This pattern has a neck facing or a neck binding.  Since my fabric is the type that rolls and stretches and loses its shape way too easily, the facing offered a simpler means of finishing the neck. In a fabric with more body, the binding would be a better imitation of the Tosca. This fabric needed shoulder stabilization with an extra bit of woven fabric sewn into the french seams. The floppy fabric is also the reason there are no pockets. It just isn't worth it because they couldn't hold anything without sagging. This fabric, I am told, will s t r e t c h. (See this post by another sewing blogger.)

In my experience, it really wasn't that difficult to sew, even with french seams to control the fraying. In fact, in most cases, it was so malleable that setting in the sleeves and matching the plaid across seams was easier than with a straight woven fabric. It is definitely a very forgiving fabric! The sleeve length was just a wild guess in this case, cut along the "lengthen or shorten here" double line in the jacket sleeve. However, it is long enough to have a deep hem that can be cuffed up.

Or not.

In spite of the differences, I am really pleased with this dress. I can see that the fabric is not as fine as the crinkle linen that was used for the Tessuti sample, but since this rayon/cotton is more opaque, I prefer it as a more practical, age-appropriate garment. True, it isn't as long as the Tosca, but that was my decision. I opted for a more conventional length, to be worn without an underskirt.

Still, I couldn't resist trying, with the aid of photo editing tricks, to imitate the modeled sample.
I don't mind making myself look older and grayer, but I couldn't find an editing tool for the glasses and the short hair cut.😂

Sunday, June 25, 2023

Combining New Look 6511 and McCalls 8197

Detour: While waiting for the white, summery fabrics to get washed and dried, this make combines the sleeves and skirt from McCalls 8197 with the bodice from New Look 6511, and adds pockets, to make a full coverage dress from a sedate sateen. Hopefully, cooler weather is not too far off. 🥺

The McCalls pattern is cute, but it requires an invisible zipper in the back. Something with a single button in the back is easier to put on. Using the simpler bodice also avoids the zipper, the bodice lining, and the low-cut neck. It also lowers the empire waist and thereby lengthens the dress. The fabric came from Fabric Mart, 3 1/2 yards of cute brown/black print Sateen; cost: $15.75; 58" wide; 20 oz. It is like a lawn, so quite light.

The armhole of the size 16 in the McCalls (the smallest size in the pattern block I have) is similar enough to the armhole of the size 14 in the New Look. The sleeves fit well enough. Both patterns specify sateen, thus this soft and light fabric worked just fine. Per the instructions for the McCalls, the neck is bias bound. That too worked well because the sateen is heavy enough to not need a lining. The pocket piece is from McCalls 8192, a pattern that has fitting issues with the princess seams. The bodice of the New Look pattern is a much better fit, especially since its armhole darts really work well for me. The skirt is the longest option in the McCalls pattern, combined with the ruffle for the shortest version. Even with all this extra coverage, there is still over 1/2 yard of this sateen left.

I really like it. I should look for more sateen.

Saturday, June 24, 2023

Using Vogue 9258 to make a white summer top

A simple black skirt meets a fancy white and black top. Will they be compatible? Read this to find out! Vogue 9258 is the subject of a few reviews that indicate it runs small. For that reason, my first version was quickly sewn up in a Feathery Leaf Sketch Printed Linen, 2 yards, 42" wide, $21.   This fabric was listed as a misprint and was offered at a discount by Fabrics and Fabrics. My assumption was that there was an error in the appearance of the print, one that I could perhaps cut around. Instead, it is too much ink throughout the printed motif. There was so much dye or ink applied in this print that the black areas are stiff. After washing, the white softened a bit but the black remained stiff. Since the pattern sketch of this Vogue top appears to show it standing away from the body, i.e. not draping, this linen seemed a logical choice for a wearable toile. There was one benefit from the excess ink in that it secured the cut edges, making it possible to get by with simply pinking the edges instead of a more time-consuming finish. (I had tried open flat fell, and had considered overcast or bias-bound finishing before realizing that the edges just weren't raveling.) With that, it sewed together quite quickly.


The size 16, the largest size in this bundled size, looks ok, but a size 14 will definitely work for the next version. The only modification I made was to move the dart point down by 1". This make used purchased single fold bias binding and 4 buttons from my button box, that is it.I like it well enough. I might make it again, but I would rather try the version without buttons. That one has a keyhole opening in the back, with a single button.

Saturday, June 10, 2023

Sewing Hot Weather Dresses

Given that Peppermint Magazine patterns are wonderful; gingham is in fashion; and the weather is hot, my answer to the question of whether I should sew a Wide Strap Maxi Dress was: Yes, Yes, and Yes!

The dress came from 4 yards black and tan mini check homespun (100% cotton, 45" wide, made in India, $14.36). There is a huge, unbelievable and unexpected weaving flaw in this fabric. One of the rows of black is missing a few weft threads, making it obviously narrower that the others. Since it never occurred to me that such a flaw was possible in gingham, I did not look for it. That's too bad, because there was enough fabric to cut around it. Now, though, it is sewn up and it looks like a seam or something odd across the back. Since this is a house dress and not a big deal, it is staying. At least it is in the back where I will not be looking at it.
There were not many modifications, other than removing a total of five inches in length, an inch or two each in the bodice, the skirt and the hem. (Both the front and back pieces of the pattern are now permanently altered). There was another (optional) 1 inch taken off the hem. This version is a E at the top graded to a D at the bottom. A size D all the way would have worked. The straps are wider in the center and placed about a half inch further into the center back. The facing needs to be a bit wider to fit properly. Here, the facing seams are narrower than indicated to make it fit. It was very difficult to get the straps in the right spot to cover bra straps and to adjust the elastic in the back. Another approach would be to run a couple of ties run through two channels in the back to make the back adjustable. The length of the straps is ok, but could be a bit longer. Maybe, straps that tie at the shoulders would be better. This dress is my go-to at home wear on a hot summer day. Another option for those days is the Southwest Day Dress that is based on a photo of a RTW dress.


This project used remnants and 2 yards of the Taos Texture print cotton from Taos Adobe Quilting. The 16" of the Kokopelli print cotton from Taos Quilting was enough for the top and a patch pocket. Some leftover rayon/linen blend in teal from JoAnn was more than enough for the center panels, even though they required piecing. Simplicity 7024 vintage pattern provided the shape for the top. The center panel is cut at 8" and measures 6" across once pleated. The side panels are 14" wide from the center seam. There's enough ease in them for two small 3/4" to 1/2" pleats on each side. A repeat make should use the same print for the top and the center panels and possibly omit the center panel in the back. It could be wider, with deeper pleats, or it could have side slits or side pockets. There are a lot of possibilities in this design, especially since it uses remnants.


The Taos Texture was quite prone to ravel and is finished either with zig zag and pinking or by turning under the edge and top stitching.

ETA: This post was written in the summer of '22, only just published in the summer of '23 after finally taking a photo of the Wide Strip Maxi Dress. It is hot again, and more hot weather dresses are underway. If any get completed, they will be posted here.

Ok, one more, in a crinkle gauze using the wide strap maxi pattern.  This is now cut down to a size D all over.  There wasn't quite enough fabric, so it is 5" shorter at the hem.  I moved the dart point down one inch, a standard modification that I didn't mention above.  The crinkle fabric is difficult.  See my post on the Tosca Tunic knock-off for more on that.  This fabric is especially difficult in that besides the stretching, it has a rough feel.  However, it is very light and will be nice on those hot, hot days.


Friday, June 9, 2023

Mandarin Collars, Denim Jackets, Railroad Twill, and a 1977 Pattern

New Look 6513, my recent make, put me on to Mandarin collars. A search found a vintage pattern on eBay, Simplicity 7998, a pattern so old that there is only one size provided (or it may that it is the Canadian version). Just one size meant there had to be a muslin made. The fabric is duckcloth left over from the bag I made, 100% cotton, 44" wide. The 2 yards were $9.99 reg, $4/yard on sale, $8 total. Once I laid out the pattern pieces, I saw that the pattern was missing the two pieces for the short sleeve option. With only the long sleeve option, the fabric was not enough for all the pattern pieces. The seller could not find the missing pieces and sent a refund. I used that to buy a size 12 version of the same pattern, figuring I could use the sleeve from it with a slight adjustment. (Note: The first pattern came with an extra yoke piece from another pattern--it's now in the envelope for Vogue 9255. That pattern includes a yoke top that might could use a lower, deeper yoke.)

There was over two yards of the arrow print, in a gorgeous slate blue, but it was narrow and missing a large chunk (the pockets in the bag). To get the best use of what remained, I cut just the pieces I needed as I worked through the construction of the jacket. This is a carefully considered approach, one that allows for a lot of thinking and testing, necessary because I was not only dealing with limited fabric, but I was also trying to align the print and match it as much as possible across pieces. First I cut out the body pieces and sewed them together, thus allowing me to visualize how it would look before placing the next pieces on the fabric to cut. Next, I pieced together the facing, putting a seam through the longer portion to save as much fabric as possible for the sleeves, pockets and cuffs. Once I constructed the jacket body, I realized that the fabric I had pulled out of my stash for the binding and trim would not look good with the main fabric. Neither would the main fabric with its large graphic. Another trip to the store yielded white duck cloth for contrast. Since the contrast is extreme, I decided against using the contrast fabric for pockets. I eaked out long sleeves even though they required piecing in additional fabric so that the seam line was hidden by the cuff.

The construction was tricky. However, the duck cloth was easy to sew. It helped too that it was very much a test garment. I am not sure I would ever wear this graphic print. Rather than having the pressure of creating an error-free finish, I concentrated on the details of construction, planning a final jacket in an nicer fabric that I will wear. Contruction details, such as reinforcing the 90 degree corners and aligning the collar edges to the jacket front were particulary time consuming but not overly frustrating. The 46-year-old pattern instructions were exacting but easy to follow.

Sleeves set in easily and the fabric pressed out smooth. Loops, bias binding, all per pattern. The exact size buttons required were located on Etsy. Only after ordering did it become obvious that they are being shipped from the Netherlands. For a couple of dollars! Unfortunately, they are not white enough to use for the jacket. However, they were sufficient to determine that a 1" plain rectangular toggle button looks good on the jacket.
Mood fabrics in New York City stocks a nice button selection. They had a white toggle button reasonably priced.
The white shirt is the Toaster sweater, version 2. The skirt is a summer ponte knit from JA, cut to McCalls 8055, size 14 with a size 16 waistband and 2 inches in length added to view C.
A good version of this jacket is in my future, but the fabric choice is not set at this time. It could be something to wear with the railroad twill from Stone Mountain and Daughter. The twill fabric is 2 yards of cotton spandex twill with a railroad stripe in indigo/ivory, $26.00, 8.26 oz/sq yd, 280 gsm. 52" wide. This is silky but heavy, not much stretch but feels smooth. A skirt from McCalls 8222, view B came out great but convinced me that there will not be enough of the twill left over for the vintage jacket pattern, not even with a cropped jacket and the short sleeve piece. (The size 12 is just 1/4" deeper in the sleeve cap, so a small mod in either the sleeve cap or the jacket armholes should make it possible to use the size 12 sleeve in the size 14 jacket.) Adding 1/2 yard of "denim" from JoAnn still wasn't enough to complete the jacket. (This is a very stretchy denim, selected for its weight, softness and similarity in color to the railroad twill. It is so stretchy that it ruffled when the edges were serged. 64% cotton, 33% modal, and 3% spandex. cold wash, line dry, $6.25.) It is disappointing, but there just isn't enough of the railroad twill left for a reasonable jacket. On top of that, washing the 1/2 yard of denim made it stiff. This unseasonable project is put on hold until the fall.
Making a knit top to wear with the skirt served as consolation. The particular shade of indigo in the railroad twill was difficult to match, but careful shopping turned up a knit jersey, 60" wide, "Peacoat Navy", 200 gsm, 95% rayon, 5% spandex, Machine or hand wash, cold, line dry, $10.78, made in China, at Hobby Lobby. It is a wonderful, soft and drapey fabric, lovely to wear and difficult to sew unless there are multiple layers or stabilizer to secure the stitches. Prior to figuring that out, I ruined a sleeve after a good solid chunk became embedded in the feedplate. Thankfully, there's over a yard left, so I was able to cut out a replacement and continue with the otherwise straightforward construction of New Look 6458, a pattern I have used for two dresses. This top uses the dress pattern but has sleeves instead of armhole bands. The sleeves are near perfect but need a bit longer hem. A size 14 tapered out to size 20 at the hips worked well. In a heavier fabric, tapering to size 16 would be better. Rayon jersey tends to stretch out long and narrow, making excess fabric a safe bet. This simple jacket pattern will probably be followed by a more traditional denim jacket, in khaki cotton twill $3/yard on sale, 60" 3 3/4 yards, $11.99 reg, $11.25 total. Someday. For now let's concentrate on summer clothes.

Friday, April 28, 2023

New Look 6513

Whatever possessed me to make a first version of a pattern in an expensive, difficult to obtain, long coveted fabric? Thank goodness this is not a tale of woe. Either the fabric is quite easy to sew or my skills are improving.

The fabric was 1 1/2 yards of Nani Iro double gauze in New Morning print, bark brown. It's 100% cotton, 43" wide, $26.00, again from Stonemountain and Daughter, purchased to go with the bright blue denim blogged in my previous post. This fabric has been on my purchase list for a while. It is hard to miss the enthusiastic reviews it has been getting, but equally hard to buy fabric on a review alone. After all, there's a lot of double gauze out there, mostly for half the price. Could Nani Iro be so different? Of course my answer to that question is now yes, it is worth it. So why not break out the cute, complicated pattern that resembles ready-to-wear?

The only problem with using a good fabric for a first toile is that it is best to start with a larger size. Since my heart was set on a nice top in this lovely fabric, cutting it out too large was not an option. The cut lines used were at size 14, grading to size 16 at the hips. They worked well, but the larger cut on the hips might not be necessary.

Regarding the pattern, it is complicated, but here are some helpful hints: First, don't bother to mark the pleats on the fabric. The pleats follow the line of the princess seamed dart that is cut into the fabric. Just mark the end of the pleats and the sewing line on the dart. Sew the dart and pin the pleats so that the stitching line is 1" away from the previous seam. The pleats are 3/16" deep when folded (they take up 3/8" of fabric). In fact, the cut line in the neck makes it obvious where the dart starts, so once that is cut accurately and the bottom of the pleat under the seam is marked, you are good to sew. The facing for the front slit goes on easily. (Ignore those confusing on line reviews that complain about the instructions--unless they are complaining about the neckband.) The neck band is not easy, but the instructions are clear. The end result is quite neat, and worth the extra effort on the tightly curved seams.

There was really only one problem with this fabric, one that I saw as soon as I prepared to sew the back and side seams with a French seam. The copyright for this fabric sits well away from the selvedge, so far that I cut the back pieces including the copyright name. The letter ended up outside the seam allowance, so now it sits in the middle of my back. If I had looked at the print carefully before I cut, I would have tried to avoid using the fabric with the copyright on it. Additionally, I would have reversed the direction of the print. Most of the flowers seem to point downwards, as though they are falling to the ground. In addition to the possibly upside down flowers, the copyright is on both the back and the waist tie. As it was, however, there was just barely enough to manage the neckband without placing a bunch of mismatched flowers on it. A Nani Iro print like this one needs extra yardage to allow for "fussy" cutting.

The sleeves were difficult to set in because the gauze fabric is sticky and hard to smooth down. Since the pleat might make the sleeve too tight, the pleat depth was sewn at 7/8" instead of 1". The hem was turned down 1/4" and sewn at 3/4". It's been worn with the new denim skirt from the last post. It has been washed and still fits, just barely. It probably wouldn't look as tight without the back tie pulling it in.

It remains to be seen if I will sew this pattern again. It is cute, but so cute it should be reserved for dressier occasions.

Sunday, April 2, 2023

Skirt Sewing Success, McCall's 8222, and a repeat Alberta Street

Some of the fabric that was on end-of-season sale at a price "cheaper than muslin" was quite nice. The piece used for this first try of a skirt pattern is a lightweight cotton. It may be considered quilting cotton, but it is smoother and lighter weight than most of those. The fabric is a floral print, 100% cotton, black and white with green and gold accents on gray background, 44" wide, 2.5 yards, HL $6.99 reg, $3/yd on sale, $7.50 total. The toile started with a size 18.

And problems! This pattern has a fly-front zipper. That was a first for me. After following the pattern directions most of the way through the zipper install, I missed the second-to-last bit about pushing the fly facing out of the way when top-stitching the fly. As a result, the fly was sewn shut by the top-stitching. Thank goodness for my long-standing zipper rule: remove all the basting as soon as you have it sewn in and zip it up and down. If you can't, there's a problem! As a bonus, this testing routine also lets me spot any unattractive sewing around the zipper. The zipper is in now. It actually unzips and is much straighter than it was at first.

The side seams could have been simple. However, this lightweight cotton was a good candidate for French seams. In spite of my limited experience with French seams, they worked great. The other seams are all either enclosed hems or heavily topstitched, except for the fly facing. There was no seam finish for the raw edge of the facing. It is interfaced, so maybe that is why it is left out? Since fusible interfacing doesn't usually survive a machine wash, though, the raw edge was overcast.

The waistband did not fit the skirt. It was a couple of inches smaller. After checking the other sizes for waistband length, it was obvious that this is the correct waistband and that the darts and pleats are correctly sewn. It was just that the skirt stretched out. The top edge of the skirt should be stay stitched at some point. Since it was already stretched, there was nothing to do but ease it into the waistband by gathering it a bit, mostly in the back. The pockets and fly had stabilized most of the front sections. With that, the waistband is a perfect fit.

Lastly, there was a problem with the buttonhole due to operator error (forgot to pull down the buttonhole lever). Note: If the lever pull down step is fogotten, just rip out the bit of buttonhole and start over. Don't expect the machine to remember where it was when it went into error mode! With a manual finish, the salvaged buttonhole works well and is completely obscured by the button when it is fastened.

This is a great skirt, even if it is a size too large. It may shrink with repeated washing. There's another version coming up, in the recommended twill fabric. It will be smaller, and maybe shorter. Other modifications will be larger pockets (Using the pocket from McCall's 8205 will make the pocket a couple of inches deeper so that my phone won't fall out when I sit down!), and more topstitching (maybe). The hem on this skirt is topstitched at 1" with a lace hem tape sewn to the seam allowances on the sides of the front slit so that the topstitching continues 1" from the edge around the slit. The pattern provides for a narrow folded and double top-stitched treatment on the front center seam, a treatment that would work in the recommended denim or twill fabric.

Not wanting to lose my skirt mojo, I cut into some precious denim I scored with a lucky on-line purchase. It's 1 1/2 yards of a cotton/spandex denim in bright blue, costing $16.80 from Stonemountain and Daughter Fabrics. Since it is such a bright blue, I opted for traditional gold topstitching at 4, tension at 6. Since this is my fourth version of this pattern, it is a size 12 waistband and graded to a size 10 skirt. The grading was a little off. The skirt, sewn with 5/8" seam allowance at the side seams, fits in the waistband and lower skirt, but the portion from the waistband seam down to 4" below the start of the pockets needs more room. For this one, I sewed a smaller that 3/8" seam there but will need to adjust the cut line in the pattern before I cut out another version. In the expectation that I might want to change the side seams later, they are sewn with a rather large stitch, pressed open with an overcast stitch on each edge.

However, I am not sure I will make another Alberta St. skirt for a while. I have made 3 already, 2 of which I wear frequently. This one gave me the opportunity to play with topstitching on a nice denim. Stitching in the ditch to secure the waistband facing worked well in this fabric, as did the topstitching on the yoke, hem and back flap.
The exposed zipper used in the back zipper opening was a design choice that has its own story. It's one of those cute little metal zippers with the scalloped lacy edges on the zipper tape. These zippers could be attached with the tape on top of the opening to leave the fancy zipper tape visible. However, that means that the raw edge of the zipper bottom would be exposed. In the end, since a denim skirt did not need scallops and lace, only the metal zipper is exposed, with a standard exposed zipper opening with a facing.
As far as future versions of this pattern, there was 1 foot of fabric left over, so 1 1/4 yards of any fabric wider than 48" will be enough. 44" wide fabric will probably take more, maybe not. A final note on topstitching: I visited the local Bernina shop to discuss sergers and coverstitch machines. Their machines are mildly interesting, but not really tempting to me right now. The staff at the shop suggested that a wider twin needle with a stretch tip might help solve my wavy hem problem with the knit fabric that I experienced in my Toaster sweaters. I bought one to try, as well as a couple of packs of topstitch needles. Topstitching with a topstitch thread really looks much nicer than with regular thread.

Saturday, March 18, 2023

New Look 6511 and Toaster, First Tries

Since the two tops from Vogue 8922 were successful, I have tried out a couple of others. New Look 6511 is a pattern for a trendy top, one that is fitted on top but breaks into a full gathered skirt above the waist. My "muslin" shopping in the end of season sale fabrics this fall turned up a gorgeous batik, 100% cotton, black and tan/gold, 44" wide, $12.99 regular price, $5/yard on sale, Since it wasn't really "muslin" type material or price, I did constrain myself to 2 yards, keeping it to $10 total.

I furthered the frugalness by using sheermist batiste in black for a lining. That was a modification, since this pattern does not call for lining. Rather, it uses single fold bias binding at the neck and armholes. The back slit at the neckline is just folded in and stitched. None of that seemed nice enough for this pretty fabric. I cut the lining out first, in a size 14, grading to 16 at the waist, a size 12 at the front neck and a size 18 at the back neck. The back neck height is probably ok in the size 14, but the seam allowances at the neck and the armholes are only 3/8" to allow for the bias binding attachment. Adding that bit extra from the size 18 allowed me to sew a 5/8" seam at the neck. The darts are good where they are; the side seams are actually ok at the size 14, but the back rides up and out a little. Adding 1/4" to the back shoulders has helped. Once the skirt was sewn on, it weighed down the back enough to make make everything sit properly. The pattern is now adjusted based on how the lining fit. So the lining was actually the toile, because I love this batik too much to consider it a toile.

The pattern recommends 4.5" of ease, meaning that my size was between 14 and 16. Cutting the 14 puts it at 3" of ease at the bust. The pattern photo looks like it has less ease than that. Although it is very cute that tight, reducing the ease in this fabric is probably not a good idea. That would make the top difficult to put on and to move around in, since this fabric has no stretch. Nontheless, the top baloons out in back and fits well in the front only because the shoulders (either its or mine) make it sit forward. It fits from the armholes to the bust because of the darts, then boom, fullness, an effect that is problematic for this fabric which has no drape. While the fullness could disquise bulges, the waist is not fitted enough to compensate for it. The fullness would be eliminated by adding darts or by tapering in the side and back seams for a better fit at the bodice below the bust.

Adding darts will correct it but would change the original design. The pattern intends an A-line shape that widens from the armholes to the end of the bodice. I intend for it to be more fitted, like the photo on the pattern envelope. A second version should have less ease, either through tapering the side seams or adding two 3/4" darts in the back, one on each side of the center seam, about 2.5" from the seam and shortening the skirt by a proportionate amount. (i.e. several inches)
The top is long on me, more a tunic length. The skirt I plan to wear with it is below knee length and looks good enough with the longer top. The means of making the button loop or fastening needs work, but first I must shop for an alternative elastic or other material. In the meantime, the elastic loop can stay fastened when I pull it on.

ETA: I have since altered this top, taking in the side seams and back seam 1/2" each and shortening the skirt 5". I also attached a self-fabric loop for the button at the back neck. It is improved and may actually see some wear. I will be using this pattern for a dress now that it fits.

The Toaster Sweater from Sew House 7, Version #1 is an older popular indie pattern. There are hundreds of versions blogged, reviewed, youtubed, etc. My only hesitation about sewing it is that I do not have cotton sweatshirt-style fleece that has the recommended amount of stretch. I'm sure a Toaster will make a great sweatshirt, once I find that stretchy cotton fleece. In the meantime, I used the 1/2 yard of the brown ITY knit that remained after my Lodo Dress, along with another yard of the same fabric in Ponderosa green. It worked well. Since the fabric specs are in my post on the dress, I won't repeat them here, other than the price of the green fabric--$6.52. I cut a size 10, tracing the cut lines on the fabric with chalk and cutting with a rotary cutter to see if it is true that using a rotary cutter on knits makes them nicer to sew. My conclusion is: a little.

In an excess of caution, I cut the bottom band to a size 12. Once I basted the raglan and side seams together, I felt it was made for a decent fit, maybe a bit loose. Even with a thicker fabric, the size 10 will work for those pieces. The final seam uses a knit stitch at 3/8" seam allowance, but since the needle sits over to the left for that stitch, it is closer to a 1/2" seam. That should tighten the fit about a half an inch, making it between an 8 and a 10 and allowing for more shrinking when machine washed and dried. The fit is good, the collar stands up in this ITY, as it certainly will in a fleece. The optional top stitching with a twin needle looks good on the raglan seams, but made them pucker a bit. Since most of the top stitching is on the body, which is brown, omitting the top stitching on the green makes for an intentional look. The only omissions of top stitching are at the neckline and sleeve cuff. The neckline doesn't need it and the cuff, the cuffs are a problem.

The sleeves are too long for me. The sleeve itself should be shortened by at least 1 1/2". Since it is already cut out (that's the purpose of a toile, after all, to find and correct issues with the pattern), the cuff had to be reverse engineered to work this out. Taking 3/4" off both the sleeve and cuff meant that both had to be reshaped. After sewing the cuffs to the sleeve with a 1/2" seam, the sleeves are almost the right length--long, but not too long. Additionally, since there wouldn't be top stitching to hold the seam allowance in place, I changed it to a cuff with a facing and enclosed seam by hand stitching the inside cuff to the turned down seam. The end result is comfortable to wear but has a bulge at the seam from the thickness of the seam allowances.

The body length is ok. The size 12 band fit the size 10 body. It could all be smaller. Unless a repeat of this pattern is in a fleece or otherwise thicker fabric, a size 8 with a size 10 band would be the correct choice. The top stitching ripples the fabric. Based on another top, even using the walking foot does not stop that. The sewing is a bit difficult in this medium weight fabric. A thicker fabric might require a different approach, such as sewing the cuffs on before sewing the side seams and sewing the seam allowance down on the outside (for comfort) with a visible hem stitch. Or--just buy a serger?
I have been wearing it all day and liking it a lot, even the colorblocking. The fit of the raglan is the best of the several raglan patterns I have tried. Raglans are my favorite sleeve design so it is confounding that the raglan dresses I have sewn so far fit so poorly. This one is super. I need to compare it to the others and see what is different.

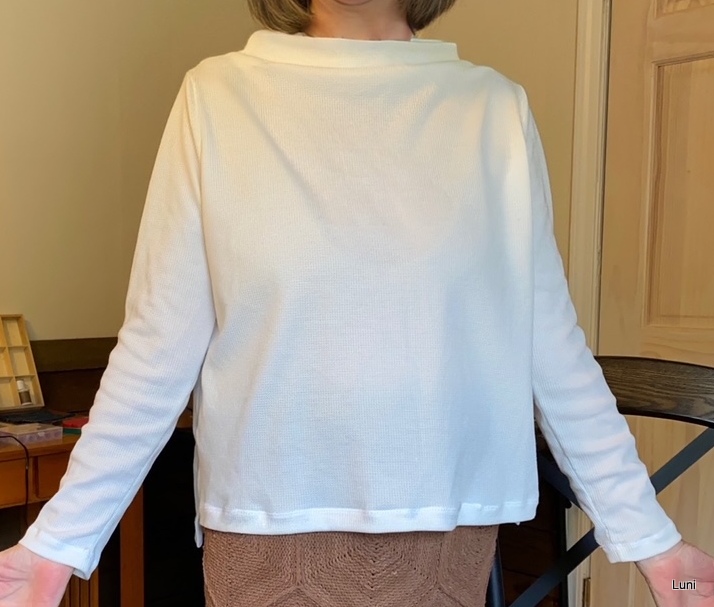
My toile of the Toaster #2 used a 1 yard Shao White Waffle Knit remnant, 75% poly/23% rayon/2% spandex, $2.12. The fabric can be machine washed, gentle, cold, line dry, cool iron. It was originally 16.99/yard. This top also used an additional 3/4 yard of the same fabric (60% off, $5.19). The total cost of fabric was $7.31.

I used the stretch zig zag to sew it, set on a narrow and short stitch, maybe 2 (or 3) and 1. For hemming, I used the visible hem stitch, set to 5 and 1.5. That sits on the fabric around the waffle pattern so that it resembles the twin needle stitch that is recommended. I find the visible hem stretches better than the twin needle stitch. Unfortunately, even with the walking foot, the hem did not avoid that stretched out effect the twin needle top stitching created on the muslin of Toaster Sweater #1.

The only problem I had with this top was in distinguishing the right side of the fabric from the wrong side. I misplaced the seam tape on the front, ironing it onto the right side. (Note: The double stick seam tape recommended to secure the folded neck facing does not stick well on this fabric.) I was going to cut off the facing a bit and put it on correctly, but had so much difficulting in telling which was the right side and which was the wrong side that I decided that it didn't matter. The front is on the other side from the sleeves and the back.

I really can't tell any difference in the fabric now. As far as fit goes, I cut the size 10, expecting it to be big. It is a bit oversize, not much. I did make the seams a little wider than the 3/8" specified. I shortened the sleeve by 1 1/2". That's a 1/4" or so too much, so I should change the pattern adjustment I made.
<
Finally, I finished my annual sweater. Ha, I only knit one sweater a year now, and this beauty is it for this winter. It is the Aava Sweater modifed from pullover to cardigan and it looks great with the Toaster Sweater and a 2022 knit skirt, the Snapping Turtle Skirt from Knitting Nature by Norah Gaughan.

Thursday, January 26, 2023

Not Clothes, Instead Bags

I used to be a serious devotee of the Fringe Association blog. In those posts I saw, I thought, a like-minded knitter. That was a rare event. Early on in my knitting "career" as my friends termed it, I realized that just because someone else knitted, I should not assume that we had anything other traits or thoughts in common. Nonetheless, I bit once again when I found the writings and the products of the now-defunct company. I even purchased a few items from the shop, dealing with the predictable disappointment when I received them. Ah, the internet is that place where things look so pretty but are usually useless. I watched, bemused, as the frenzy for some products grew. I stared, appalled, as other knitters posted walls of products I would never buy. I just couldn't believe they would pay what I considered an unreasonable price for a commonly available item and repeat that same purchase multiple times. But I shrugged it off. That's them, not me.

Then, this fall, I received a message, from beyond the grave as it seemed. The dead blog spoke. I bit. I bought the Field Bag pattern and a swath of painted canvas. That was my Christmas present. I only just opened it last week. Life intervened.
This is my toile, made in duck cloth.  I will make one in the kit fabric later.
However, now I dream of owning a wall of bags, similar to that I saw posted years ago. The only difference is that I will make them for what I hope will be a fraction of the price. Maybe I will actually use and enjoy them. If nothing else, the pattern and a few additional yards of fabric and notions will provide me with entertainment this Spring, when my closet is full, my dance card is empty, and I seek inspiration. Gotta keep the brain cells circulating.

To start, one pattern, with notions, as a kit from Grainline Studios. A bit of fabric. My short acquaintance with canvas. Things I am learning: canvas is different from duck cloth. Canvas is about twice as heavy and stiff. The bag relies on the stiffness of the canvas to stand up. To aid the stiffness of the duck cloth, I am lining it. The wrong side of the printed cloth I chose is not particularly attractive. Lining will hide the wrong side. In addition, I am interfacing the lining with Pellon Decor Bond, a fusible interfacing product. It isn't fusing very well, but the stitching of the pockets, side seams and drawstring casing will hold it in place.

The pockets went in well, even with my one modification; I added a zipper to the grommet pocket and omitted the grommets. I have the grommets in my kit and may add them to another version. However, I am not sure I would use them to separate yarn as I knit. Once threaded through, the yarn would have to be cut to remove the project from the bag. That's not a big problem, but it will create a couple of ends to weave in, possibly in the middle of my project if I am changing what I'm carrying in the bag. Since the grommets will keep yarns straight when I am knitting with two strands, I want to try them at some point to see how I like using them--but not in this bag. This bag will be used immediately to carry my sock-knitting and reading supplies, supplies I want to use during rather long wait times. The zipper will keep my kindle in place without the on/off button being constantly pushed, as is happening in my purse. I realize a kindle isn't a required knitting accessory, but I get tired of knitting and need to read a little during long waits.

The next bag will be plain on the outside, with pockets that are made to better fit the items I want to carry. Once I have used the first one, I will know how to outfit the second one. The third one will likely use the painted canvas and may have grommets. After that, I may be tired of this pattern and have moved on.

The technical details are that this bag used most of 1 yard of printed duck cloth (100% cotton) from Hobby Lobby, a bit of Pellon Decor Bond, and the strap and drawstrings from the Grainline Studios kit. The duck cloth was on sale for $4.79/yd., the Pellon products were $2.39/yd., and the accessories in the kit, including the grommets, can be purchased for $11.00--without the grommets, it might be $7.00. A little dirty math puts the total cost around $12.00. It took about three days for this first bag, an hour or so a day. The next ones should go faster. The zipper isn't included in that, but it is a used zipper. It was 9" and was cut off shorter. If I need another zipper I will buy a 9" zipper and cut it a bit longer than this one. It isn't quite as long as the pocket. The ends are covered by bits of the fabric selvedge, making a neat edge that doesn't have to be topstitched or overcast.

This toile was successful, creating a cute and useful bag. Other than the zipper in place of the grommets, there are no changes to the pattern. It is a small bag, basically 9" x 5". In the bag is a sock project and the tools to finish the remaining sock. It fills the bag. If the project is larger than socks or other accessories, the bag would need to be larger. Since I also have the Stowe bag pattern from Grainline, I see the larger version of that pattern, which makes a bag 14" x 7", might be something to try.