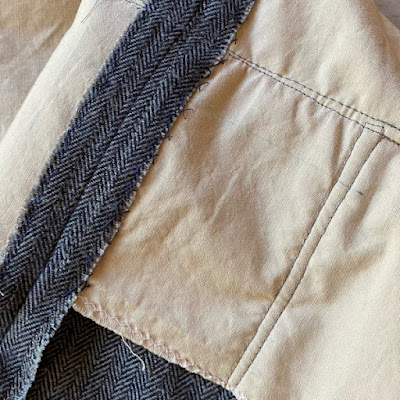
Following the method used by Susan Khalje in her Craftsy class on couture sewing, I am underlining the jumper with Kona cotton that I had bought as a remnant. (Kona Khaki, 1 yd. $2.70) It is not a good fabric for apparel on its own but should serve well as an underlining to prevent the herringbone from stretching too much and to help anchor the facings and seam allowances. Additionally, it is washable and will make this winter-wear jumper warmer. Otherwise, this fabric does not need underlining to add weight or provide a more comfortable feel. However, the facings in this pattern flip out so much that an underlining would help if the edges of the facings and seam allowances are sewn to it. Couture sewing!
Having made this pattern twice, I know that the armhole fit is still an issue. For this version, I cut the shoulders down to a size 10 and cut the armholes to a 12. This pattern has different facing pieces for each size, so the facings for the armholes are a size 12, and the front neck facing is a size 10.I drafted a facing for the underside of the kick pleat at the hem. It was not "couture sewn"(i.e. hand stitched), just machine sewn in place since the stitching on the bottom portion of the pleat is hidden by the top section.
The neck facing went smoothly, thanks to the methods I learned from Susan Khalje. This pattern is not the best use of those methods, being a very casual jumper, but using them here allowed me to practice what I learned in Susan's classes on Craftsy.
Here is how to put it together:First, stay stitch the neckline on the flannel and the Kona underlining. Second, machine baste the underlining to the flannel at the shoulder seams with a 1/2" seam and trim the underlining back to 1/4". Third, machine baste the flannel and underlining together at the neckline. Fourth, sew the shoulder seams. Fifth, hand stitch the seam allowances to the underlining with a "catch stitch". Khalje uses silk thread for this, but I used what I had on hand, hand quilting thread. Matching the thread to the flannel and using a single strand really made it less noticeable. That is the preparation of the jumper. For the facing, which is interfaced with fusible woven interfacing, all that is needed is to sew the shoulder seams, trim them, and edge finish with a zig zag stitch.
Once the facing is sewn on to the jumper and understitched, it is stitched down to the underlining by hand with the catch stitch, then topstitched 1/4" away from the neckline edge. That facing is not going to flip out or fray. It is totally secured.
The armhole facings are attached in the same manner. My choice of armhole facing size was not perfect, but reducing the seams in the facings from 5/8" to 3/8" made them fit. Then the seam allowances are checked to make sure they are all stitched to the underlining where there is underlining. After the underlining ends, the seam allowances are zig zag stitched to finish the raw edges and prevent fraying. There was not enough of the Kona cotton for a full underlining, but there is just a few inches between the end of the underlining and the hem that is not underlined.
The pockets are folded over and top stitched at the top and gathered at the corners to round them nicely. Button reinforcement patch made of doubled interfacing was added below the top stitching. Pocket flaps were rounded more at the corners and topstitched per pattern.
After sewing the pockets and pocket flaps to the dress, I would suggest a couple of modifications. First, the edges of the pocket that are turned under could be trimmed. The easiest way to do this would be to sew them down 1/4" in from the edge and trim them close to the stitching. That would eliminate the need to sew the second line of top stitching as well as securing the edges for sewing. While this step is not necessary, it would reduce the raw edges inside the pocket. Second, secure the pocket flap so that it does not flip up at the edges. The pattern suggests velcro. However, knitters avoid velcro. What if I wanted to carry a ball of yarn in the pocket, or stick my hand in the pocket while wearing hand-knitted gloves or mittens? That would result in the velcro catching on the yarn or knitting. It should be buttons, snaps, or even a zipper. In this case, buttonholes and maybe even snaps will be added to the flaps as soon as I get to my Janome machine. It makes better buttonholes than my Singer. (The old Singer can handle this heavy fabric well.)
This one is finished with a 2" blind hem, as was the linen version. All raw edges are now controlled and no raveling, fraying, or flipping will occur.
One final observation: the sewing took 4 days. That is extensive, especially for a dress with no darts, no waist, and no sleeves. However, it is a much better dress than the others that did not include an underlining and catch stitches. The control over the fabric that couture sewing offers makes the process and the end result much more satisfying.
For my other versions of this pattern, see this post.


No comments:
Post a Comment