Tuesday, August 31, 2021

Burgundy Vines Circle Skirt

The first version of this skirt was made with a remnant and McCalls 8205.  The fabric, from JoAnns, (916773228) 108" wide 100% cotton, two pieces a little over 3/4 of a yard long, total cost $9.25, was cut cross grain because it gave me more length.  It would probably be a little easier to sew the curved seams cut properly.  This is obviously quilting cotton because it was 108" wide, therefore wide enough to use for quilt backing.  It is a modified circle skirt with a shaped waistband and back zipper.  Although a wearable toile, it is about 2" too big in size XL and a little short. The pockets are a little different from the usual side pockets in that they are sewn into the waistband.  They are also large and sewn into the side seam for a couple of inches top and bottom.  Things should stay in them without the usual falling out when I sit.  The directions omit the instruction to sew the pockets to the back and front, but that is what is needed before sewing the side seam.  There should be a 1/4" seam in the seam allowance, four pocket pieces sewn to front and back on each side.

The interfacing I used was fusible because this waistband needs to be sturdy--it supports the skirt but still will ride up and down. I followed the instructions for hemming, first making sure the hem was cut as correctly on the pattern curve as possible.  It took a long time to pin and sew such a long hem but it wasn't difficult.

By far, this is the cutest thing I have made.  I will definitely make it again, probably with another quilting cotton.  It needs to be either a size L or somewhere in between L and XL, and long enough to hem easily. 

The unexpected success of that first version spurred me to a second in a linen/cotton beige
stripe fabric that I bought early on in my fabric shopping.  The piece was from JoAnns and was 1 1/2 yards long and 56" wide.  It sold for $14.99/yd. for a total of  $22.49.  It is a little fancy with a shiny stripe through it, Lurex.  (179310724 56" 56% cotton, 43% linen 1% lurex.  Hand wash, line dry, cool iron. 4.6 oz/sq yd.)  This version is Size L, View A, with an added 1" in length.  There was enough fabric for the slightly longer shortest length option and the yoke and facings, but only 2 pockets.  The other 2 pockets were cut out of the brown (Potting Soil) linen blend that I consider too stiff for apparel.  Getting all 4 yoke/facing pieces was difficult; one was cut on wrong side as a result.  Managed a more matching one out of the scraps.  This size works well, but future versions will need more than 1 1/2 yards unless it is actually 60" wide fabric. 

In sewing and fitting, I modified all four waistband seams to be less than 5/8" at the top, so simply less tapered.  This may have added a little to the finished band, but it still measures 34" on the inside at the top.  If I make this again, I would add 1/2" to the center back and front, (all pieces) then adjust to fit as I like.  That would put it between the L and XL.  This version is too short for my taste.  The next version should be cut 3-4" longer.

ETA: No other versions at this time.

Tuesday, August 24, 2021

Simplicity 8192 (vintage) Pattern

Beginning the sewing portion of this blog as it should be, at the beginning, requires going back over two years to the Summer of 2020. Up until then, my sewing had been focused on repairs, alterations, and a brief foray into upcycling. Although there was sporadic garment sewing, those garments only supplemented my retail wardrobe. That summer, however, the urge to follow the small crowd of sewists showing off their makes sparked enough of my interest to lead me to purchase a few pieces of fabric from Fancy Tiger Crafts in Denver. Patterns from the 90s were dusted off and altered to match my altered state of living and the altered state of my figure. 

The first product was a pencil skirt from the durable hemp/organic cotton blend "denim" in Indigo. At 57" wide, 1 yard was enough. Alas, even the largest size of this old pattern (a 12) with a rather generous waist allowance was not enough to achieve a comfortable fit. It took removing all four waist darts. This, thankfully, was a step too far that was modified by inserting elastic in the waistband. There was enough fabric left over to add two large patch pockets to the front of the skirt. Although I initially rated this skirt as too tight and the fabric too stiff, my opinion has changed. There is nothing like wear to stretch and soften this fabric. It is very comfortable and very practical now, a great fit to my current life style. The pockets to hold a wallet and keys make it perfect for shopping trips.

Simplicity pattern 8192 (vintage), size 12 but altered.  Waist Measurement is 30", Hip Measurement is 40", Length from Waistband to Hem is 22 1/2".  Cost was $23.

I was so happy with this success that I repeated it.  This time, I used some of the 2 yards of Elizabeth Suzann cotton poplin in black that was part of the same order from Fancy Tiger Crafts.  I had been reading about Elizabeth Suzann designs and was excited to get some of her fabric.  I was less excited when I received the fabric, and have since decided that poplin is not the best fabric for a pencil skirt.  However, I used less than half of it for the skirt and have been using the rest for bias binding for other projects. 

The skirt, as you might guess, was not a success, even after a couple of alterations to improve it.  It is now a plain black skirt, a little too big, that hangs in the closet.  No picture of this one will be posted here!

These two "wearable toiles" were followed by a serious attempt to alter the pattern to improve the fit and function.  The third skirt is made from 1 1/2 yards of  teal Linen Look Fabric Solids, (Sew Classic) from JoAnn (12993534,  52" wide,  85% viscose, 15% linen)   Total cost was $13.64.  This time, using a Threads article on how to alter a pencil skirt pattern, I adjusted the front to fit a fuller stomach, added pocket bags and narrowed the skirt below the hips.  The fabric is better suited to a skirt than the poplin, a little less suited than the "denim".  Also, the color coordinates well with a cotton/linen sweater I had just knitted.  Overall, this third version of this pattern is the best of the lot.  To bring this up to the current time, the fabric has not held up to promise of the fit.  It falls somewhere between fashionably wrinkled linen and soft, nicely draped rayon.  That is to a nice place to be.  It does not respond to ironing and insists on staying mildly rumpled and clingy.  However, the pattern is now modifed for a good fit and will probably work well in a different fabric.

In cutting out the pattern, I modified it per the Threads article, making the front larger but keeping the back a size 12, mostly.  I moved the front dart closer to the edge--the Threads article said it should be over my hipbone--raised the front by adding a wedge to it (this is now permanently part of that pattern), and followed the lines of the expanded waist I had used in the two earlier versions.  The waist was still a bit small, so I kept the side seam allowance to 3/8" until below the hip, then went to the standard 5/8".  I cut the waistband a couple of inches too short, forgetting that I needed seam allowances and a tab in the back.  After lengthening it by adding a piece to the back, I ended up with a 36" waistband including seam allowances.  To adjust that down, I added 1" elastic to the front, bringing it in to 32".  This is a little large, but since I prefer the waistband to sit a little below my waist, it is good.  The hip shaping goes from 37 1/2" to 40".  

The pockets are an experiment, copied from a sewing blog.  Although they are less noticeable than the patch pockets of the denim version, they are placed a little too high on the hip to be as functional.   Still, I like the pockets well enough to repeat them if I make another version of this pattern. 

There is 1/2 yard remaining, so for 50" wide fabric (after washing), I only needed 1 yard to make this skirt, with pockets and longer waistband.  The finished skirt is 25" long and the hem sits just below my knee.  Cost is $9, not including thread, zipper and interfacing. 

Also in current time:  A year has passed, but this old pattern is still useful.  There's a tank top in it.  Cut to the largest size (12), with 1 1/2" added to the sides at the bottom, tapering to a couple of inches below the armholes, it works well.  This tank top pattern, which was first used for a tent dress that was drafted from one I purchased, was now used for a tank top in a lovely rayon twill purchased from Stone Mountain and Daughter.  Using 1 yard of Tencel Twill in a marbled pink/gold/khaki print, 100% rayon/viscose/tencel, (take your pick of term because it is a little unclear) 60" wide, $18.80, machine wash, hang dry, 3.6 oz/sqyd, 125 gsm, for the tank top, using bindings instead of facings.  


I used bindings on  the first cut of this pattern, in a rayon twill from Fancy Tiger. I hand-sewed those bindings down, and found that those are crinkled after much washing. With the tencel twill, since the fabric is lightweight, I folded the bindings and stitched them to the top with a 1/4" seam.  Then I understitched them, fold them to the underside and top stitched them down using a walking foot to avoid puckering.  This is similar to the pattern instructions for the facings, except that I doubled the thickness of the fabric.  

Despite my careful sewing on this expensive fabric, the neckline binding flipped out.  It will  press into place, but not without a bit of puckering.  This is a deep scoop neckline that should have been stay stitched prior to binding.  The fabric along the cut line stretched out, making it difficult to fit the binding as tightly as it should have been.  The next time, depending on the weight of the fabric, it would be better to wrap the binding over  the neckline instead of sewing it on and folding it down.  Either way, the neckline must be stay stitched.

It's a basic, well-fitting tank top in a fabric that I love. Now that the pattern has been altered and the neckline can be improved, it will be used again. Considering together the skirt and the tank top, this old pattern was well worth keeping.

Wednesday, May 12, 2021

Two knit sheath dresses

 New Look 6458  

I have sewn two dresses from this pattern.  The first was a bleached denim look knit that I bought at Hobby Lobby. It is a fairly heavy knit with a soft hand, poly/viscose/spandex.  About 2/3 poly, very little spandex.  I cut a 16 on top and a 18 on bottom, shortened the waist to shoulder length by an inch and the length by about 6 inches.  The armhole band is wider than the neckband in the pattern.  Since the 16 is large on my shoulders, I sewed the armhole band deeper, taking in another 1/4" or so of the bodice.  If I were going for the cute boatneck and wide shouldered, tight armhole look of the pattern, I would just cut a size 14 and follow the pattern.  However, I wanted to have an option to wear this dress with a shirt--or not.  The deeper seam made the armhole band match the neckband and the armhole large enough to accommodate a thin knit shirt.  I mostly used the knit stretch stitch for this dress, mode 1, stitch 9 on my S3.  For the hem, I used a knit zig zag to turn down 1/2", trimmed it to 1/4" and blind hemmed it.  Overall, a nice success for a lovely fabric.  The dress, since I can used the leftover fabric for a skirt, cost me about $9.00.

I had purchased another cut of a gray fabric at the same visit to Hobby Lobby.  It is knit and was shelved with the bleached denim.  However, it is very different in feel, pure poly/lycra and quite thin.  Still, it is much more tame, being gray with small white chevrons similar to sergeant stripes in the military.  I wanted to try making some pattern adjustments to this one to improve the fit and add pockets.  I cut the dress pieces the same except that I cut the size 10 armhole, merging it into the size 16 shoulders and cut the size 10 neck in front.  The first version with the size 16 front neckline chokes me a tiny bit.  To make the neck and armhole bands fit this modification, I cut the armhole band 19" long and the neckband 24 3/4" long, moving the markings to the edges.  I couldn't find the notched marking for the back of the armhole on the band.  It's on the pattern for a size 10 but not on the band.  I need to look at the pattern pieces and see if there is another band piece for a size 10.  This time, to make sure I wasn't choked, I sewed the neckband 3/8" in back and 1/4" in front.  I used a decorative stitch to top stitch the bands, setting my Janome Skyline S3 to mode 2, stitch 2, length 2, width 2.  That produces a slightly stretchy stitch that has a zag out into the body every 2 mm.  I sewed the armbands 3/8".  If I trace this pattern permanently to have it to use repeatedly, I will narrow the armbands for this version.  I am not sure that I would ever want to have a nice dress to wear sleeveless again.  I might try a version with sleeves, although the way I cut into the pattern for a size 10 in the armhole would have to be adjusted to the appropriate sleeve size.  I copied the flat square pockets from another knit dress I bought, cutting them 7" x 10" (need to check the width--7 or 8?).  It is a very simple pocket that works better with knits that the usual side seam pockets I use, sewn into the side seam and top stitched to the front.  I top stitched it last, but it may be possible to stitch the pocket to the front, turn in and top stitch the pocket opening in the front, and simply sew pocket and back and front together all at one time, omitting the front from the seam over the pocket opening. 

I hemmed it in the same manner as the bleached denim dress, it is just below my knee in length, with the slit on the right instead of the left.  That's just because I forgot to stop sewing at the slit when I first began the side seams.  Since I was on the left seam, I just stopped for the slit when I sewed the right seam.  The slit may be optional with the shorter length, but I wanted it for extra mobility.  I have a good bit of fabric left over. 


The fabric for the gray dress cost $8 per yard.  I bought 2 2/3 yards for total discounted price of $15.

The fabric for the blue dress cost $9 per yard.  I bought 2 1/2 yards for a total discounted price of $16.

I used MCcalls 8055 to make a skirt out of the scraps, and I mean scraps, thanks to a cutting issue, of the blue dress.  I have more of the gray fabric left but am not sure that I want a skirt out of it.  It is a bit thin for a skirt.  I could use it as a muslin for one of my t-shirt patterns, just to learn the pattern and the sizing.

I am publishing this post quite late so that I can add my thoughts after wearing these two dresses for a year.  I have found them to be quite practical for my lifestyle.  They are not the most flattering items in my wardrobe but they are quite comfortable.  The only things I would have changed was to add pockets to the blue dress and to not bother with an embroidery-style stitch for the top stitching on the gray dress.  These are both simple and serviceable.  The softer fabric on the blue one is already showing signs of wear, but that's more of a recommendation--it gets worn a lot!

Friday, February 3, 2017

Dull Knitting

I've been doing more to improve my knitting than simply using up older stashed yarn. I have been trying to produce practical sweaters that I will wear often. Here's a catch-up listing of those, as proof that my knitting projects are not all brightly colored. As always, complete details are in my Ravelry projects. Most of these were knit in 2016.

Lifesavers Cardigan pattern, Tanis Blue Label yarn
I never thought I'd knit a sweater with fingering weight yarn, even though I bought it in Canada for that purpose.  Once I finished it, I found I like it. It is just warm enough and very comfortable.
Portage cardigan pattern, Zara yarn
This superwash yarn makes a heavier sweater.  It doesn't have buttons, so is wearable despite the weight.
Wanderling pattern, Elsa Wool fingering weight yarn
This is a fabulous yarn for a sweater, soft, warm, light and lovely to knit.  The pattern is cute, but the cables pull in, affecting the fit in the shoulders.  That's a small defect, though.  I love wearing this sweater.

Lightweight Raglan pattern, Berroco Ultra Alpaca Fine yarn
Lovely pattern, good in this yarn, but would probably be better in a less elastic blend.  It is a practical sweater, simple and comfortable except for a small itchy spot in the front of the neck.  I can loosen the neckline a little--I tightened it up by shifting the stitches at the welt--or put in a facing in a softer yarn.
Yoke sweater of my own design using cvm yarn from local mill
This wool is very itchy, making it a challenge to design a sweater that I can wear comfortably.  I think it is a success but will know for sure after next winter. 

Gehry pattern, Brooklyn Tweed Loft yarn
This sweater wasn't quite done when I took this photo, but it is completed now.  I have worn it, but wish I'd knit a smaller size.  The yarn is nice and light, but too itchy for me.

Truss pattern, Cascade Cloud yarn
This pattern is not as flattering as I thought it might be and the yarn is heavy. Still, it is a comfortable weight and goes with all my black and gray, as well as blue jeans.

Definitely Susan pattern, Madeline DK yarn, the single spun
Gosh, I love this.  It took me a couple of years to get around to knitting the scarf.  I'm so glad I finally made it because it makes the sweater a lot more fun to wear.  The yarn is superwash but the sweater is so small that it isn't heavy.  Or maybe the Tosh Merino DK is just a lighter spun yarn.

There they are, the sweater output brought up to speed.  I'm glad I listed them, as it points to an issue I've been ignoring for years.  I can't wear most wool comfortably.  I tried to buy more rustic yarn last year, but I found them more itchy than the superwash yarns I've bought in the past.  Since I'm tired of working with the way superwash stretches out of shape, I've concluded that I should explore (shock) acrylic or acrylic blends as well as confining my purchases to alpaca, merino, cormo, or other soft yarns.  Now that I've knitted up a backlog of sweater yarn and explored some of the new options, I can make my purchasing more practical, as I've done with my choice of colors and patterns. 

Monday, January 30, 2017

The Meaning of My 2016 Knitting

In 2016, a lot of my personal items were damaged by a flood.  This was a difficult time for me, emotionally and physically.  Of course, I kept knitting through the trashing, sorting, treating, cleaning, repairing and restoring that was required.  That I kept knitting, finishing up current projects and starting new ones didn't surprise me.  What surprised me was that I suddenly looked at my stash with new eyes. 

I had a few hanks of yarn that I had chosen for color.  These hanks were pleasant in appearance but overly bright and clashing when knitted up.  Suddenly, during the period immediately after seeing a lot of my personal items looking particularly dirty and soggy, these bright colors called to me.  Something I was never going to knit seemed like the ideal thing to knit.  That was how I discovered that knitting with yarn that is bright and maybe not so beautiful can be helpful in crisis.

Of course, I was reasonable, choosing patterns for accessories that might mix into a wardrobe of neutrals and limiting myself to two projects.  There was a Carlisle scarf with a central color of chartreuse sock yarn.  I found enough sock yarn in my stash to complete the scarf.


Then there was a variegated sport-weight bfl that was a riot of green, yellow, and brown.  I bought some lovely black Anzula Cricket to use with it and produced a Marley shawl that is appalling on the wrong side.


However, the right side is moderated by the black.  Since I only wear such large shawls at home on chilly days, I find the bright colors cheerful on a gloomy day.  The yarn itself is lovely--very soft and comfortable.  If I tire of the colors, I could always dye it black.


I worried while I was knitting these projects that I was wasting my effort.  Now that they are completed, I am happy with them.  I am also happy that they took these yarns out of my stash.

 
Although these are only two projects, they were crucial in my destashing plan. They took it from a mere reduction of the quantity to more nearly a complete clearing of stashed yarn.  I suddenly became more determined to eliminate my stash.

Wednesday, December 3, 2014

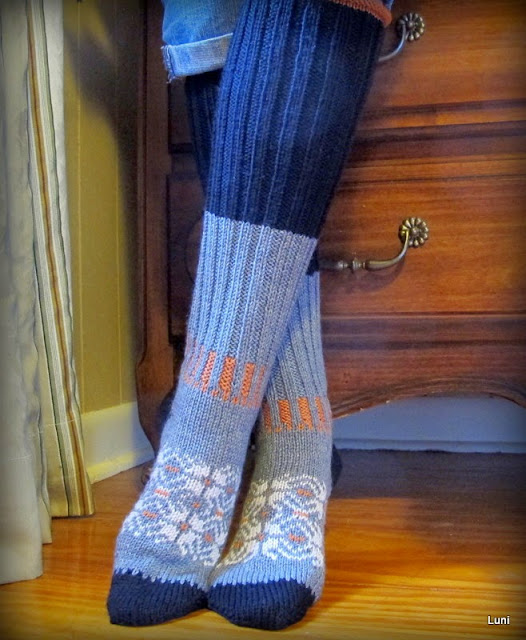
Maximix Knee Socks

My latest pattern is available through the link below as well as on Ravelry.com. Maximix Knee Socks offer a means of combating two problems that beset knitters in the Winter, cold feet and pattern boredom. I've tested the benefits of knee socks in the cold and feel confident in the statement that where wool socks are good at preventing cold feet, knee-length wool socks are even better. I'd have knitted more knee socks but for one problem--they take a long time to knit. I developed this pattern to overcome that problem.  Using heavier-weight sock yarn, sport-weight yarns, and even dk-weight yarn makes these socks warmer and quicker to knit.  The changing patterns keep the knitting interesting.


Maximix knee socks use heavier yarns knit at a larger gauge than regular socks. Since thick socks don't fit well in most shoes, the heaviest yarn is reserved for the leg of the sock. To keep the foot warm and snug, there's a bit of stranded knitting between the toe and the short-row heel. Contrasting colors add interest and make it possible to use bits of leftover yarn. I'm so pleased with the comfort and warmth of these socks that I just knit a second pair.


While I knit the second pair, I checked the pattern and tried out a few modifications. The final result is my best version of this pattern, which I hope experienced knitters will find both practical and fun in its approach to knee socks. I'm making it available for free . Click this link:
download now
or click this one to go the the pattern page on Ravelry:

Maximix


Saturday, April 19, 2014

Double Knit Sock Heels Pattern

After seeing such widespread interest in more durable, longer lasting sock heels, I've written up a how-to for double-knitting sock heels. I've knit several pairs of socks with double-knit heels. You may be familiar with the first ones:


When I first wrote about these, I wasn't totally happy with the result. Since then, I have improved the design, producing a second pair with better-fitting heels.


These were much better heels. Still, I've improved the design even more since then. The pattern includes two different methods of knitting double-thick heels: a simple one for those that don't want to fuss with two strands of yarn and a standard two-strand approach that offers the opportunity to add a design to the heel flap. I've improved the leaf and added more designs.  I no longer offer support on this pattern.  If you would like a free copy, click this link:  download Double Heeled Socks

to download the pattern and the chart for the leaf pattern you see in the photos here,

or click this link to go the the Ravelry Pattern Page:  Double Heeled Socks