Monday, December 26, 2022

Two Versions of the Lodo Dress by True Bias

A quick toile of the Lodo Dress took less than 1 1/2 yards of ITY in Potting Soil, one of my favorite JoAnn colors. I was able to order 2 yards (their minimum for shipping of fabric (57" wide, 60% cotton, 40% polyester, machine wash gentle cold, dry flat, cool iron, total $14.98), enough for either length of the Lodo Dress. After a spin in the washer and dryer, it lost 2" per yard, thus was only 1 7/8 yard, maybe 54" wide. I knew I wanted a below-the-knee dress, so I took 2" out of the length for view A, later using another 2" in the hem. One half of a yard remained after cutting the front and back. The facings are cut from 1/2 yard of a cotton paisley print fabric from Hobby Lobby (only $3 after 40% off, with a good bit left over after the facings were cut).

The center back and shoulders were sewn together with a stretch stitch, 09/1.5/3.0. There's no ripping that stitch out, but it looked the best of several zig zag options I tried. Facings were applied per pattern, but I did pink the edges, clip, and understitch them before basting them down. Then I used double needle topstitching on the facings, the back vent, and hem for a more professional look. The side seams are sewn at 1/4" instead of 3/8" for now. It may shrink more with wearing and washing. If not, it could be taken in.


The shoulders do not fit well, resulting in drag lines from the bust to the hip. If this doesn't resolve over time, I won't make another Lodo Dress. However, I wouldn't hesitate to try cutting the pattern back to shirt length, if I can resolve the fit issues. There's not a good cap sleeve knit top pattern in my stash.

The second version of this dress used a novelty fabric from Fabric Mart. It is 1 2/3 yard of a wild red ruffled knit, 56" wide, costing $4.20. As required by the pattern, the dress needed 1/2 yard of a printed cotton fabric for lining. This fabric is a poly/cotton blend. While the fiber content is similar to the content of the fabric used for Version A, these two knit fabrics are quite different. The ITY is a stable knit with minimal stretch. The ruffled knit is stabilized by the woven-in horizontal pleats. Without the horizontal seaming to secure the pleats, the fabric would be very stretchy and quite sheer.

Since the first version was cut on the size 10 lines, this one was cut closer to a size 8. Actually, it is a size 10 at the back shoulder and in the hips, between the two sizes at the bust, and a size 8 down to the hem. After lengthening the dress by two inches, the hem was cut to the shorter version, View B. The fabric is easy to sew, in spite of its texture. The pockets added as an afterthought were a bit difficult.

The problem was solved once I decided that pockets cut from woven material should be overcast around the edges. Once they were and the placement calculated, the actual basting and sewing were easy. Thank goodness, for the pockets are cute and convenient, especially with the printed lining fabric showing a bit. After wearing the dress, the pockets proved useless for anything heavier than a hankie. Everything else just falls out in this soft fabric.

The hem required that the pleat in the back of the fold be stitched down to prevent it from hanging down below the hemline. Once that was done, a simple topstitching was all that was required. Horizontal topstitching along the woven-in pleat lines practically vanishes in this fabric.

It is quite a success. Now that it's done, it seems that red dresses are popping up everywhere. Must be a trend!

Wednesday, December 21, 2022

Roscoe Dress and other pattern difficulties

Pattern difficulties are rare for me. Mostly, there's nothing in the simple sewing patterns that I attempt to assemble that puzzle me. If there is some piece or instruction that doesn't fit, it can be worked in, or worked out, one way or another.

Most likely, the fault is my tolerance. There's always anomolies, some that I tolerate, some that I don't. My issues with the toile of the Roscoe dress pattern are minor. The fabric is 4 yards of a 100% cotton twill. (Brown Herringbone Cotton Calico, 44" wide, 4 yards, $19.56 at HL after 30% off, plus 33" of same, in a sierra red purchased as a remnant for $3.84.) This is very light, would be good for hot weather. That should be enough for the dress, in fact there should be about a half a yard left over. Since I had nearly a yard of the same fabric in another color, I was hoping to get both the dress and the short sleeve version of Vogue 8877 out of the total 4 1/2 yards. The anomoly in the fabric is that it shrunk to under 40" wide after washing! That's what I call short of fabric. The anomoly in the Roscoe pattern is that the straight lines do not match a straight line. They are not off by much, but they are off. What could cause this printing problem? Tissue paper? wrinkles? humidity? a crooked ruler? I don't know. With these little issues, this project was kinda getting on my nerves.

My work arounds were: cutting the front of the dress on the selvedge edge;(Yikes, I know, I am reckless.) and cutting the back ruffle a couple of inches narrower than it should be. Even though the sleeves could have been a little longer, I settled for just adding 2" to the 3/4 length sleeves to get them to be long sleeves. After all that, there was only about 3/4 yard of uncut fabric left.

Once past the cutting, there was the pattern itself. The neck band is cut on the bias but the sleeve bands are cut cross grain. The neck band stretched out to be a couple of inches longer than the the pattern piece. Perhaps it would be better cut cross grain? Either way, both the neck band and the sleeve bands wriggled out from under the needle when I tried to stitch in the ditch. That was a frustrating process, with a lot of starts and stops to secure the folded bands. With the band and the added length, the sleeves are still short, so a proper cuff would be good, or enough length to allow sewing a casing and putting elastic through it to avoid gathering. Another issue is that the folded and sewn down ties attached to the neckband twist. The folding and sewing was a bit of a surprise. Usually these type of ties are sewn from the wrong side into a tube that is then turned right side out with a bodkin. Alternatively, the entire neckband and ties could be replaced with a casing twill tape. That would avoid gathering.

Regardless of these small issues, the dress is good, especially in this fabric. It has enough drape that I could have cut a 10 instead of an 8. However, I prefer that the Roscoe, with its lack of pockets and lack of pizazz as a dress, should just be cut as a blouse. In that case, the size 8 it is now cut to will work well in a variety of fabrics.

Next came Vogue 8877. First there was the toile, the first time I attempted the pattern. This pattern does have a lot of ease and could have been cut smaller. However, the size block I have starts with a large size. Truthfully, the large is probably the best size, as long as it is cut a bit smaller in the bust and on the cut line at the hips. The only fit issue with the large size for me is that the yoke is too deep. After the toile, I adjusted the yoke to be an inch shorter. Using the the remaining brown fabric plus a little less than one yard of the same fabric in an unfortunate pink/orange (salmon) color was enough for a second toile of Vogue 8877. Less than one yard of each color is not really enough, forcing me to cut a yoke and a body of each color and mismatch them--the front has a salmon colored yoke with a brown body while the back is reversed. Since there was more of the salmon fabric, the back is cut a couple of inches longer than the front.

That's the big reveal. I think it is cute, and that Vogue 8877, for all my angst, is just fine. The only thing to discourage repeated sewing of this pattern is that color blocked patterns mean changing thread, if I care to match thread color across colors. In the end, my sizing insight from this whole experience: for patterns that must fit on top, buy the smaller size and adjust the bottom. For ones that must fit on bottom, reverse that, and buy the larger size. In sum, buy larger sizes in skirt patterns and smaller in tops and adjust accordingly.

Monday, December 5, 2022

McCalls 7981, View D (new) and View A (toile)

Warning: The waistband on this pattern is 4" longer than listed on the pattern piece. Although it matches the other pattern pieces, it is larger than the lengths in the size chart. However, the discrepancy between the size chart and the pattern pieces can be accounted to ease. If you don't want ease at the waistline, size down. Do not refer to the measurement printed on the waistband, at least in the L-XL sizes. I prefer elastic in the back of my waistband and use the larger size to allow for it. However, it is nice to know after sewing the toile that I don't need the size XL in this pattern.

Another revelation from sewing the toile is button placement: Reviews of this pattern report a problem with gaping between the top two buttons. That problem ocurred with my flannel toile. It's because the buttonhole is placed horizontally on the waistband and vertically on the button band. In that case, the head of the buttonhole on the waistband should line up with the buttonholes on the buttonband, allowing the button to slide all the way over and still be lined up with the other buttons and the button band to align with the buttonhole band. In the toile, I centered the waistband buttonhole over the button band buttonholes. That didn't work because the pressure at the waist will make the button slide over the the head (left side as worn) of the buttonhole. The simple fix was to move the button over so that the bands align. However, on this and subsequent versions, I will place the waistband buttonhole further away from the edge of the buttonband and make sure the button is sewn in the correct spot to allow it to sit at the head of the buttonhole and still be lined up with the other buttons. Still, a fastener at the bottom of the waistband might help line up the button band with the waistband.

About a year ago, I made a wearable toile in this pattern, using View A, with an additional 6" in length. That made it between View A and B. I cut a size XL, even though L would have been large enough. Since there are only two sizes in the size block I purchased, it made sense to use the larger size for this wearable toile to allow for alterations and to take advantage of the drape of the fabric. This length used the full complement of 7 buttons, plain off white ones that were left over from a sweater project.

The fabric was purchased at JoAnn and was 3 1/4 yards of cotton flannel in a printed plaid, 44" wide, $11.90. After machine washing and drying, it shrank to 40" wide and 3 yards long. There is at least a yard left over, so the actual cost is nearer $8. The contrast fabric is a brown Buffalo plaid flannel remnant from JoAnn (161008103, 3/4 yard, 86 cents).

All pieces were cut out with the fabric flat, except for the back which was cut on the fold, folded along a vertical stripe. Nonetheless, the plaid matching was difficult and is not as good as it should be. Matching the pockets to the exterior fabric, which meant cutting two of each fabric, did work well, since the side seams sit at an angle and the pocket and side plaid pattern can not be matched the full length of the seam. Matching the front button bands to the front panels was close--the horizontal lines of the plaid match and the vertical lines would have matched if I were happy with leaving the seam of the band that the buttons are sewn to exposed. I was not, so the plaid misses matching vertically by 3/8".

The hem method was a simple blind hem 1 1/2" deep with the button band folded over the hem. I put tailor tacks in the button bands to mark button and buttonhole placement. However, the 1 1/4" buttonholes were adjusted to the button size to 1 1/8" by the machine and the placement is 3" apart. The tailor tacks, which took some time, might not be necessary, especially in a small plaid like this one, where the buttons can be placed along the lines of the plaid.

There is a little extra fabric in back waistband that is taken up by 14" of elastic which is sewn down at the sides (where a side seam would be). The elastic could have been a little shorter, but not any longer than that. Adding the elastic made it a 32" waistband.

The buttonholes were very quick and easy on the Janome. I will be looking for more patterns with buttonholes now. The buttonholes in the beige thread that I used for the skirt are quite obvious on the plaid. Black would have been a better choice since they run down the black/gray stripe. It is a relief that they are even and tidy, since uneven buttonholes would have been noticeable.

Even with the difficulty of plaid matching and button bands, it is very likely that I will make this pattern again. I have just the right amount of tan linen to make View D, no matching required.


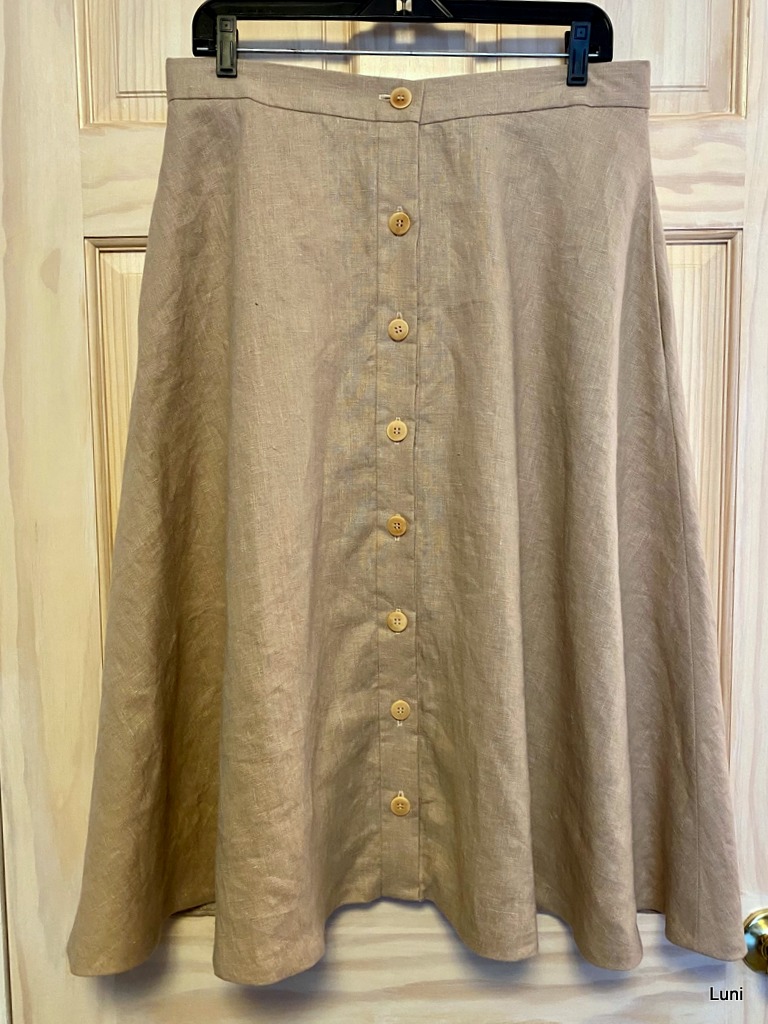
Now for the second version, a size L cut from view D, but 3" shorter. This used 2 1/2 yards of 56" wide linen, in beige, nearly 6 oz. (5.88) per sq yd, so it is heavy. Cost was $32.38 from Taos Adobe Quilting. It washed and dried beautifully, even smoothing out some variations in the weave that were like slubs. There was just one large slub that hangs ominously from a tiny hole at the lower back of the skirt. With a dab of fray check, it may stay put and not fray. This fabric does not fray as badly as a thinner linen does, but it still frays, leading me to overcast stitch the unenclosed seam allowances. It is too heavy a fabric for french seams and too light in color for a contrasting Hong Kong binding finish that might show through to the front. (In my view, a Hong Kong finish isn't worth the effort if you can't use a cute contrasting material.) Assembly was much simpler without having to worry about matching plaid patterns. After stitching the back seam and side seams, including pockets, the the hem is next. Wait, what?

The hem is sewn before the button and buttonhole bands are attached, simply because they are turned under around the hem. Although the different order of assembly is not difficult, it precludes the ability to hang the skirt, letting the fabric stretch into place, before hemming. As a result, the hem may look a bit uneven. However, the fullness of the skirt may disquise most problems.

After the waistband is attached, there is slip stitching--down the bands, around the hem and around the waistband, about 6 yards of hand sewing. Actually, the hem is supposed to be topstitched, but if you're slip stitching everything else, why not the hem?

The waistband is a puzzle. Even after stay stitching the skirt at the waist, the waistband is too short. Perhaps if the stay stitching is done immediately after cutting the fabric, it will reduce the size of the waist. However, the instructions put the stay stitching off until the skirt is assembled. At least the stay stitching can be used to ease the skirt into the waistband. Finally, putting elastic through the back waistband brought the 36" waistband in to 32-33".

View D is quite long, would be a maxi skirt on me, so I cut it 3" shorter. The result, at 31", it is a little long. It is recommended that a skirt hem hit your leg at the narrowest part in order to be flattering. (!?Flattering in what way, should it make your leg look thinner or more muscular?) For me that would be 28" for a below-the-knee length and 34" for a maxi skirt. The buttons I have chosen are smaller than required, but I have them, they match, so on they go. The eight buttons are 3 1/2" apart, a little closer together than the pattern calls for the larger buttons.
The vest is a recently completed knitting project, something quick from leftover yarn. I thought I would have to make a top to wear with this skirt, but it turns out that my hand-knitted sweaters all look great with this skirt.

Saturday, November 26, 2022

Button-up Dress, Peppermint Magazine

When I ordered the linen doggie bag cut I used for my Sorbetto top, I also purchased another cut from The Fabrics Store. This one was DB IL019, softened linen in Graphite, a dull dark gray. It was 1.5 yards long, 59" wide, and weighed 5.3 oz/sq. yd. The total paid was $13.78. Inspired by a dress I saw on Net-a-Porter, I was hoping I could get a simple sleeveless dress from this lovely linen. These are my inspiration photos:
The front is busy, with the contrasting buttons and scalloped asymmetric closing, but the back is simpler.
Once I found the Button-up dress pattern (a free download from Peppermint Magazine), I hoped 1 1/2 yards of this wide fabric would be sufficient. To work around the short yardage, I cut the facings from black Sheermist Batiste (45" wide, 65% poly/35% cotton from Hobby Lobby). This lining fabric was on sale for about $4/yard, but since it did not take a yard for the facings, the cost was less than $3. Even without the facings, I was short on fabric and had to cut one of the pieces. Rather than have a seam across a pattern piece, I cut the side front panels and added a pocket, lined in the batiste, at the seam. There will be lots of deets here because it looks so good that I may make this pattern again.

For the pocket modification, I first cut out the fronts, back and the side back. With the remaining fabric, I marked a line on the front side panel at the height for the pocket, (meaning my hand would easily reach the pocket and my fingers would just touch the bottom of the pocket when my arm was fully extended. I used the "lenthen or shorten here" line, measuring 5" above it.) Placing the marked pattern piece on the remaining fabric at the shorter section of what remained after I cut out the back, putting it at the fold, but not on the fold put the pattern piece over the end of the remaining fabric with my pocket mark on the fabric, within 1/4" of the edge. I cut out that piece, then placed that piece and the attached fabric (still pinned to it) on the longest part of the remaining fabric, the part that remained in the center after cutting out the shorter back side panel, lining up the bottom hemline to the end of the fabric. That allowed me to cut another piece of the front side panel that extended well above the marked pocket line. I folded down the extra fabric to make the front of the pocket bag. Then I cut a portion of the pattern, from 1" above the marked line to 8" below it from the Sheermist Batiste, following the pattern piece. This was attached to the top piece of the side front panel to serve as the pocket bag back. After sewing the Batiste to the top piece, I folded the bottom piece and topstitched it in place, keeping everything aligned with the pattern piece. To further secure it, I basted the bottom piece together an inch down from the topstitching. Then I marked the pocket bag in a tapering line that began 3" off center of the bottom of the bag and ended at the joining of the bag to the pattern piece on each side. Then I sewed the bag together, down one side, across the bottom and up the other side. After trimming and finishing the seams, I was on to the facing.

After prepping the facing according to instructions, I just turned the bottom up 1/4" and top stitched. There's not much fraying in the lining fabric. Then I forgot to stay stitch back neck and armholes, which made it hard to attach facing due to stretched out linen. Except for that, attaching the lining per instructions for front and neckline, pinking the seam allowance and clipping curves, and understitching were all simple. However, it isn't clear that the edge of the lining lines up with the edge of the placket that is then folded over after attachment, making the facing edge sit between the placket and the front of the body. There's no other way to do it, but the difference in the sizing of the facing and the body are not addressed in the instructions.

After I puzzled through the neckline facing attachment instructions, THEN they wanted me to use the burrito method for the armhole facing attachment. Wait, that is not necessary. I watched 3 or 4 you tube videos and the last one said that no is burrito needed if there is a back opening. Obviviously, that works same for garments with a front opening. Just for fun, I tried their burrito method. I didn't do it right and somehow pulled the dress through the shoulder to end up with the facing and dress wrong side out. No problem--I just pulled the front through the shoulder with my skinny little fingers. Since it worked once, I sewed the second side with the right sides together and the pieces flat. I found it much easier to sew without the burritoed fabric in the way. Then I repeated the trick I did on the first side to just pull the front through the shoulder.

While it was easy to understitch the armhole almost to the shoulder in the back, it was not so easy in front. The understitching there just goes to the princess seam. Sewing the side seam was easy except for changing back and forth between black thread for facing and gray for dress. I decided to use hem tape to make the dress as long as possible. I sewed the black hem tape on with gray thread in zigzag stitch. Black thread would have been better. However, since I used the gray thread to hand sew the hem down, there is gray thread visible at the top and bottom of the hem tape. I found the hem tape helpful as far as extending the narrow hem. However, the poly hem tape has no stretch and sticks out as the hem curves. A final note on construction: the interfacing covers the entire placket, resulting in two layers of interfacing when the plackets are folded over and stitched down. Cutting it and fusing it to the front half of the placket should be sufficient.
The buttonholes and buttons were done by my newer machine (Janome Skyline S3). The only problem occurred when the thread broke, stopping the sewing but not the machine, midway through the first half of the third buttonhole. I had to finish that one with manual zig zag and made notes in case it happens again. I think the thread broke because I had the machine speed set too fast. However, regarding thread, in my determination to find a better color match in the limited thread available locally, I noticed too late that I had sewn the dress in 100% cotton thread but purchased a better matching 100% polyester thread for the buttons and buttonholes. Three things to remember: sew buttonholes on slow speed, raise the needle between sewing each button (or set of eyes if you have a 4-eyed button) to reset the zig zag stitch, and check the thread content before you buy. On that last one, though, I don't have a preference on thread content. I realize 100% cotton may shrink, but I don't worry about that if I am sewing a fabric that will shrink along with it. Hopefully, they will shrink at similar rates! The buttons came from Hobby Lobby, gray plastic, $9.10 for 10 buttons.
Finally, here's the dress with my hands in the pockets so you can see them! This is also full disclosure that there is a good bit of width in this dress. I can go down a size in the next version. I am sorry about all the picky comments on the pattern. It is a great pattern. In my view, if the pattern is free, the company should not stress about the instructions. The instructions are very helpful. My comments are just for my own clarification when I use the pattern again.

Tuesday, November 22, 2022

Old Sewing Patterns

Retro, Vintage, or just plain old, is it worth it to save sewing patterns? Today, older patterns in uncut and excellent condition can be purchased on resale sites. Additionally, patterns from the 50's and 60's are now available in reissued form from the major pattern companies. Obviously, there is interest in using vintage patterns. How about those patterns we cut, use and age out of, should we keep them or not? Unfortunately, I can't definitively answer the question, but I can relate my recent experience in that regard.

A few years ago, I was cleaning out a closet and found about a dozen sewing patterns that I had saved for decades. Some dated back to my college years, the last time I had regularly sewn clothing for myself. Others were newer. Once the retail price of clothing declined enough to make it less cost effective to sew, my incentive for sewing vanished. At that time, I never really enjoyed sewing. It was one way of keeping my expenses down. However, even after switching to ready made, I still sewed for special occasions. Sometimes I could not find or afford exactly what I (or my family) wanted to wear. These few patterns spanned those years of occasional sewing. I went through these old patterns and kept some that were standard clothing styles, like skirts, tank tops, and simple shorts or pants. The others I posted on Instagram and asked if anyone was interested. Unfortunately, that post got no response at all. Much to my regret, I tossed the patterns in the trash can.

Over the next couple of years, my knitting feed was infiltrated with sewing posts. Project Runway was popular. All the pretty handmade clothes renewed my interest in sewing. First came upcycling my old jeans into skirts, then a new sewing machine. Finally, new patterns and sewing supplies. The newer tools and techniques have made sewing more enjoyable for me. I don't miss the old stuff, except for those patterns... I wish I hadn't tossed them. More on my biggest regret later.

Now on the old patterns that I kept. I have successfully modified a couple and use them repeatedly. Actually, there are only two items I tried that didn't quite work out.

I saved Simplicity 8192, 2 Hour Separates, published in 1992.

This is a great pattern! I bought it for the full skirt and made that for a formal event, in black moire. After that it went into the box with the other patterns. In my recent first attempts at sewing garments from scratch, I dusted this one off and produced two pencil skirts and a tank dress. The only item I hadn't made was the long-sleeved shirt. Well, I couldn't leave that untried.

Using off-white silk jacquard purchased from Taos Adobe Quilting, (2 1/2 yards, 50" wide, weighing 3 3/4 oz./sq yd.) I cut the size 12 shortened by 2 inches. Since there was a little over 1 yd left (39"), the cost was $20.

Although this pattern is designed for shoulder pads, this version doesn't have any--yet. As a result, it is roomy in the shoulders for a size 12. The silk fabric had enough drape to disguise the roominess, but small shoulder pads might be fun to try. The hips were too tight to go over other clothing but after narrowing the side seams as much as possible, it fit, just barely. The sleeves are big in the upper arms but fit in the lower arms. The sleeve length is fine. To make this again, I would need to use a drapey fabric, cut the body A-shaped and consider adding bust darts. The length could be shorter. As it is, with a 2" hem, it hits right at the hip join, my usual choice for top length. The hip width is 42", a good fit over a slim skirt but a bit too tight for a flared skirt unless I tuck it in or just let it bunch up a bit. It does work well under a jumper. The silk should be dry cleaned, but I have solved that problem--I never wear it.


Another I saved was Simplicity 7024, Ladies Front or Back-Draped Top. I used the heck out of this one back in the day, making several tops to wear under my suit jackets. When I stopped wearing suits it went in the box. Although I saved it, I didn't want another draped top--they don't make sense without a jacket. However, before I tossed it out, I became curious about the long-sleeve shirt. About that time, I placed an order from Fancy Tiger Crafts for several yards of their Rayon Honeycomb fabric. When they informed me that there was only 1 1/3 yards available, I figured that since it was 50" wide, I should be able to get something out of it. The cost was $18. I wouldn't have made that decision if I had realized that washing drastically alters this fabric. The bit I did wash as a test came out without the nice suede-like finish, dooming the rest to use as a toile.

My main focus was on altering this old pattern to fit now so that the cap sleeves are a flattering length and the waist and hips fit loosely. Also, the scoop neck and v-neck are great options. Originally, it was cut to the smallest size, a PT. Adding 1/2" at the fold for the front, back, and neck facings brought it to about a medium. Since the sleeve did not need to be larger, I left the armsyce and the sleeve a PT, shortened the body 3" at the marked line and brought the cut line out as large as possible above the hip, using all the material I had.

The cap sleeve is good, as is the scoop neck. The v-neck is too deep, but there is the option of putting a piece of material across it, either in the rayon honeycomb or in a contrasting material. It is wide enough in the hips at 44 1/2" but is large in the neck and sleeves. If I were to make this again, I would probably make the sleeveless version and keep it a PT at the top and facings, only adding the 1/2" at the hips and that or more on the sides. I would eliminate the v-neck and re-work the front neckline to a higher v-neck or a square neck. Instructions call for topstitching hems on sleeves and body. That was easy to do by turning up 1/4" and sewing it down(this material will not hold a crease), then sewing the hem down from the wrong side.)


This one was given away, so it might be worn, just not by me.

My big regret is the one pattern I tossed that I wish I had kept. It was a smock top that I made and wore for years. I put extra effort into it and was very pleased with the result. I keep looking for something similar but I haven't found it yet. If I had the pattern number, I am sure I could find it for sale.

There's the lesson here: Even if you don't keep the old patterns, keep notes. That way you will know the pattern, the size, and the method you used for all your makes. That is why I am still blogging -- this is my permanent record!

Sunday, November 13, 2022

McCalls 7122, 8092, 7606 and 7862

This post covers my incompatible sewing patterns, ones that were sewn up, hung in the closet and mostly left there. It could follow the pattern of my earlier post "Drafting Simple Sewing Patterns" and be titled "Messing up Simple Sewing Patterns". However, the pattern numbers are a more useful reference. It is not that I want to blame the patterns--the problem is not with the patterns, but with my relationship with the patterns. We are apparently, for now, incompatible. Since I have put in the effort to write about the process (I usually make notes as I sew.), I will publish my thoughts, mostly so that I will be discouraged from repeating my mistakes. I'm sure someone will look up these patterns at some time. If so, they may benefit from my experiences. However, clothes fit differently on different people and look different in different fabrics. Sometimes you don't know until you try, so don't let my opinion discourage you from trying these patterns.

First up, but last made, was McCalls 7122, a raglan dress pattern for knits (leggings are included but not attempted by me). This pattern required 1 3/4 to 3 1/2 yards of 60" medium weight knit fabric for the dress, depending on length. The only difficulty in this pattern was the cutting, simply because the large pieces were hard to align on knit fabric. Otherwise, it was a breeze. There was enough fabric to cut the large in the C length with long sleeves. View B was my preference, but after the waist was raised by 2" it would not have been long enough. Although the short sleeves would have been preferable in this fabric, I knew they would look better on me about 4" longer. However, the short sleeves are cut in an arc at the hem, precluding lengthening them.

Here is a bit of the dress, just enough to give you the effect of the print. It looked much better in the photo I saw when I ordered it.

The fabric I used was more of the cotton/poly/lyca jersey from Fabric Mart (used quite successfully for McCalls 7650), this time in a green print. Since I had purchased 2 1/3 yards for only $10.50, I added the pockets from McCalls 8085. The fabric is 56" wide, very stretchy, and sews smoothly, no walking foot required. A simple narrow zig zag worked for all the seams. Although the pattern does not suggest it, I top stitched the seam allowance down below the neckband. I find this prevents the neckband from flipping down and echos the twin needle hems. I cut 2" from the sleeves and kept them long, and then cut 2 1/2" from the hem.

Neckband--that's a nice addition, so much easier than fussing with a turned hem. A neckband also allows me to fine tune the fit by sewing a narrower seam at the back, raising the back neck a bit. The back neck is 2" below the natural neckline in this pattern, a little low for me. I find that a back neck that is too low will make the front neck ride up. Maybe that is a misconception that I derived from knitting patterns that require short rows at the back neck to lower the front?

The combination of the twin needle and the walking foot worked well for the hems. It was all very easy sewing. What is wrong? Either the dress is just unflattering, or the print is a bit too much.

In a last attempt at this pattern, I made a quick top with the short sleeves. I was not pleased with this top, either--the fit and the fabric were the problems. The short sleeves sit up above my arms too much. The fabric was a combination of a remnant and the leftover print from the dress. The remnant I used was 2/3 yard long, 60" wide, 2106847, regular $6.99/yard fabric from Hobby Lobby. The usual 30% off sale put it at $4.89/yard; my total paid was $2.79. The fabric was 96% polyester, 4% spandex, brushed, very soft and very stretchy--close to 100% stretch crosswise, some stretch lengthwise. The fabric was too stretchy to sew nicely, even with a walking foot. Also, the rust color, although flattering to my skin tones, does not go with anything in my closet. Neither the dress or the top has seen much wear so far. That should be enough to warn me away from using this pattern again.

In the summer of 2021, I tried McCalls 7606 on the theory that a wrap skirt would be more comfortable than one with a fixed width waistband. That theory did not prove to be true. For the toile, I used a blue & white variegated stripe fabric from JoAnn, 42" wide, 2 1/2 yards purchased for $22.73 plus 1 yard purchased as a remnant for $3. Since it is striped and matching was a problem, there was not much fabric left after cutting the skirt. It was 100% cotton, made in Indonesia (machine wash gentle cold, tumble dry low, warm iron). After being washed on warm/cold and dried on low, it puckered like seersucker and would not iron flat. Due to the look of the fabric and the disappointing fit, I am sorry I took so much effort with this pattern. For this first try, I modified the curved hemline to be a straight one without ruffles or curves. I cut an XL for the back, and an XXL for everything else, leaving plenty of fabric to accommodate alternations, such as deeper hems--the pattern only allows 5/8" hems. In the end, I kept the hem to 1" since it must be curved due to the a-line shaping. It was easier to follow the pattern lines than to redraft them.

There is an error in this pattern. It shows the ties attached to the side seams. That is incorrect. The ties are attached at each end of the waistband and don't need to be inserted until after the waistband is attached to the skirt.

Next, I tried McCalls 7862, using a black "tie-dye" print from JoAnn, 100% lyocell "Tencel Denim". The cost for 2 yards was $33.58. (I bought another 1/2 yard in Santa Fe for $7.20 but did not need it to cut out this dress.) The fabric was listed as 52" wide but measured closer to 60" wide. The care instructions are machine wash cold, line dry, cool iron. It does ok in the dryer but does pucker under a more than warm iron.

I cut a size 16, moving the darts lower after viewing a Craftsy class on muslins. The fabric is very nice, stays basically as I bought it, smooth, with a little drape and a bit of body. It works well in this swingy type of shape. The sleeves are large so they stick out in this fabric. Overall, with the print and the way it stands out from the body, this dress looks a bit like a caftan.

However, after wearing this dress a few times, I found the neckline was too high in front. That was especially disappointing because fitting the neckline band to the dress was really difficult. The hem construction is similar, very difficult to fit together. Additionally, the back neckline slit is too long and gapes open. To address these problems, I removed the neckband, sewed up the back slit, then bound the neckline with bias binding that I stitched on and turned to the wrong side.

The photo above was taken before this alteration. Since then, I have worn and washed the dress several times. The fabric is puckering and the dress looks disheveled. The altered neckline is still uncomfortable. I doubt that I will use the pattern again.

McCalls 8092 is a pattern I purchased because I was hoping to use an Indian block print on cotton. Before I dared to invest in this lovely piece, I wanted to have a pattern that I felt suited it. A quick trip to the pattern counter was all I could manage, simple patterns were all I was attempting. This resulted in my choosing an off-the-shoulder dress that I hoped I could modify to a standard gathered neckline. Thus began the toile.

JoAnn Fabrics sells several lines of fabric by the name "linen". Some of these are 100% linen, some are linen blends with varying (15% to 85%) amounts of linen, and some have the appearance of linen. One of these is actually 70% polyester and 30% rayon, and is called "linen look". The cut of fabric I purchased last Spring was a beautiful golden brown, almost an ochre. It was listed on my receipt as Anhu(?) Tobacco Potting Soil linen, 52" wide, 2 1/2 yards at $15.39/yd. for a total of $38.48 (012993046). Although that price is a little more than I have been paying for fabric for a first try of a pattern, I thought I was buying 100% linen in one of my favorite colors, a golden brown that is between brown and ochre. Whether it is linen or not is a guess. After washing, it remained quite stiff but thin and a bit sheer. Some of it went for the back side of the two pockets in a skirt. The rest served as the muslin for this pattern.

This dress plus the belt takes over 5 yards of 60" fabric. With less than 2 1/2 yards in this narrower piece, there was not even enough for the dress in the size L. After the substitution of a short raglan sleeve from McCalls 7862, there was enough for pockets and the ruffle at the hem. That meant shortening the dress to the view A length (plus 1" because there was enough fabric and, for me, longer is better). Beside the sleeve substitution, the neckline is 1" higher to allow for the neckline to fall normally around the neck rather than the off the shoulder look of the pattern design. The hemline ruffle is cute, and the dress is a good length, but there is entirely too much fabric in the top of the dress and the sleeves.

After a run through the washer and hanging to dry, it is definitely a wearable toile. I doubt that it is wearable outside the house--even a belt does not improve it much. However, it tops out the cool and comfortable scale and is either a very nice nightgown or an at-home dress. It gets worn now and then, notably on trips when I want something comfortable to wear in the hotel room.

The second version of this pattern was inspired by a ready-to-wear dress by designer Anna Mason. It took some inspiration to move me to make this again. This one uses some quite nice batik print in a cotton that is lightweight, more like a poplin than a quilting cotton. It is an ombre print, meaning the colors (tones in this case, since it is all gray) get progressively darker from one selvedge to the other. There was 3 1/2 yards for $12.99/yd., 30% off, so about $30. Because of the color progress across the grain, I cut the fabric cross-grain, using view A again, with an inch added at the top and the bottom of the body pieces. There was enough fabric for the pattern sleeves, cut to the middle length as well as added pockets from McCalls 7862, as in the first version, and a longer ruffle. The front was cut into two pieces at the fold line to allow a seam that created a v-neck, as in the dress that inspired my second attempt:

To allow for the edging around the neckline, the shoulders should have been raised by more than the 3" I allowed.  As far as my version of this dress, the sleeves came out nice, the sizing looks good. I even made a simple belt rather than the belt that is part of this pattern. After that, there was not enough fabric left to cut the bottom ruffle in the darker part of the print. So I ordered more fabric. It was on sale at Hobby Lobby for $9/yard. Cutting a 3 yard strip 18" deep along the edge produced the piece for the bottom tier.

This dress falls in an awkward in-between, in between light fabric that would be cool enough to wear in warm weather and heavy fabric that would make the length right for colder weather; in between casual at-home wear and less casual going out wear. I haven't worn it much. As a result, I have not attempted to make this pattern in the precious block-printed voile but have selected another pattern for that piece.

Thursday, November 3, 2022

Erin's Day Dreams Sweater

I had planned to knit an Erin Cardigan from Vintage Modern Knits, but I just could not work up enough interest in the design. That was especially troubling since I had bought the specific yarn required by the pattern, a blend of wool, cotton, linen, flax and soy silk from one of my favorite yarn companies, The Fibre Company, in one of favorite shades of my favorite color, green. I have knit a sweater from the book before and thus was familiar with the lovely cable patterns. Maybe too familar and thus disinterested? Then I remembered that I have long wanted to knit a Day Dreams sweater from an old issue of Cast On. It is knit in green dk weight cotton. Erin is knit in a sport weight. Combining the two patterns, with the challenges entailed, increased my interest enough to result in a cast on on New Year's Day.

Although it would have fit better in the small size, the medium was a safer choice, with the loose slouchy look that is more on trend. However, the design of the small size, featuring ribbing around the armholes, was much nicer than the additional cables the larger sizes required. To achieve a similar look in the medium size, I changed the cable pattern, keeping the double ribs and adding two more ribs by decreasing the cable away. Four ribs total was probably too many, or maybe the loose fabric around the arms is due to the yarn. The general rule is that an oversize sweater needs tighter sleeves. Since I did not modify the armholes and the sleeves to allow for that, this sweater has both oversize sleeves and oversize body. The sleeves could be shorter, the body longer. Since there's a skein of yarn left over, I can change that. But I am happy with it, glad it is a pullover, glad the cotton content makes it a comfortable fall wear. The color is nice, the cables of the Erin design and the Day Dream design work well together.
I am wearing it with one of the fold-over waist skirts I made last winter. I blogged this skirt design earlier, minus the following details. The skirt used 1 yard of Robert Kaufman cotton fleece in cedar (deep green). That fabric came from The Confident Stitch in Montana, for $12. Although it is listed as french terry fleece, it is more fleece than terry. Combined with 3/4 yard of olive green ribbed knit from Hobby Lobby. It did not take the full 3/4 yard--some of the ribbed knit was used for pocket fronts for another skirt. The ribbed knit is like all the other from HL, in poly, total $4. The drawstring is some cute cotton twill tape with bees on it from Hobby Lobby. It is a great skirt for the cooling Fall weather.