Thursday, October 20, 2022

Drafting Simple Sewing Patterns

How to: Watch a couple of online classes on pattern drafting, select cute, inexpensive fabrics and keep it simple. If the pattern is complicated, you will better balance reward and effort by finding a commercial pattern that has the elements you want.

The first pattern I drafted was based on the Craftsy class on making a custom A-line skirt. A pocket is on the right side. The zipper is on the left. Two darts each for front and back were copied from the slim skirt pattern, Simplicity 8192. A second pair of darts in the back is an option. If I make both the front and back larger (see comment in next paragraph about front), I can use both darts. Bias binding was used to finish the waist on the inside. The back and front are sewn together with 5/8" seam allowances. Since the skirt was a little too small, I reduced the right side seam allowance to 3/8". Still, there was not quite enough room.

Once I sewed bias binding on an inch into the waist to make it a little bigger, the fit was good. (Since the side seams taper outward, lowering the waist made it larger. The next one will need extra fabric at the front, using this one to alter the pattern. The bias binding was wide enough to put 1/4" elastic through it. That made a better fit for the waist and a more comfortable skirt. The hem was 2 1/2" deep, so the next one could be shorter if there is not enough fabric.

It is very cute, and the fit is good after the extra adjustments. After washing and wearing, it has stretched out and is comfortable, but baggy in the back. A more form-fitting one in the back might be more flattering, but it might not work well for sitting. This is, after all, an a-line skirt, not meant to fit below the hip curve.


The fabric is quilting cotton from JoAnn, 42" wide, 2 yards, $10, purchased for the circle skirt pattern but not enough. (The pattern envelope for the circle skirt lists 2 yards of 45" fabric as required for View A, the shortest option. However, what with the width being 3" narrower and the fact that the shortest option is very short, getting that pattern out of this length of fabric did not seem possible.) Although the print is very cute, the quality of this fabric is not great. The finish is soft without the sheen of the quilting cotton I bought at Taos Quilting. There's only so much one can judge from online photos. Another version would require either 2 yards of a narrow cotton or less of wider fabric.

The second self-drafted pattern was simpler to design but more difficult to sew. Cut, sew, gather eternally. That is my memory of the maxi skirt I threw together from thrifted fabric. The cutting was quick and easy, just measure and cut without a pattern. The sewing was simple, the tiers are stitched together at the sides to make loops of fabric and the top tier gets a folded-over band for elastic. The gathering, which required sewing the long bottom loops three times each, twice for gathering and once for seaming, exhausted my patience.

A second version would need a little change to the pieces if I want to add pockets. I found good consistent instructions across several websites -- it is reassuring when you see the same thing more than once. The first tier should be 1.5 times the waist measurement, the second 2 times the waist and the third 2.7 times the waist. But the length of each tier was less consistent. I went with what I considered most flattering, the first tier ending at my low hip, the second just above my knee and the third at my ankle. It looks ok, but the first tier is too short for side seam pockets.


This is a "boho" look skirt. As such, it suits me better than most of my makes, reviving those hippie days. The fabric is embroidered, tuck stitched and tie dyed a bright turquoise and indigo. I paid $10 for the entire piece and there is a little left. I made both these skirts last summer and have worn them frequently.

Saturday, June 25, 2022

Harvest Top and Alberta Skirt

Now that hot weather is here, the knit fabrics are packed away and wovens are back out. The change is a welcome relief. As comfortable and easy to fit as knits are, they are more difficult to handle, even with all the modern tools to help manage the stretch. Woven fabrics are much easier to cut. The sewing goes faster, without the need for a walking foot or zig-zag stitches.

The transition sparked the addition of new fabrics and patterns, providing a reason to write about these new makes. However, with easy successes, there is no longer a need for detailed notes on each project. I think, I hope, I can now replicate these garments by just following the simple steps as I remember them.

The first woven item was the promised third version of the Alberta Street Skirt, in a stretch cotton twill, 1 3/4 yards of black stretch denim that looks dark blue (52" wide, 98% cotton, 2% spandex, made in China, HL $17.83). The size 12 was a good fit, just needing an additional 1/4" at the top of the yoke-style waistband. That meant a 3/8" seam at each side instead of 5/8". There were no modifications to the pattern since I have found the reversed-angle pockets more comfortable as I have gotten used to them. This version was so easy and is a comfortable, flattering and basic addition to my closet. Folliowing it with a jeans-like version in a stretch denim with contrast top stitching is a possiblity.

PDF patterns have challenged my comfort level as well, but finding a printer who can handle the large size prints has helped. Still, it doesn't take too long to tape together the letter-size prints, which are the cheapest option. The Harvest (or Boxy) Top by Project Runway for Peppermint Magazine worked out perfectly for a mere yard of fabric I received by mistake in an on line order. Even though it requires nearly two yards, a size 40, shortened by a couple of inches and with the middle sections cut crosswise, fit on the fabric because I used a cotton/poly blend for the facings. The fashion fabric is a nice cotton/poly voile stripe in black and earth tones that I purchased from Fabric Mart.
There were buttons in the button box, purchased for a sweater but never used because I found ones I like better for the sweater.
I worried that the buttons in the back might be uncomfortable when I am sitting, but so far they have not bothered me. I found the pattern easy to construct, but I did change the attachment of the bottom band by enclosing the seam within it. Otherwise it was all according to the instructions.

Tuesday, April 19, 2022

McCalls 8248 and 8085, Sewing Failure, Sewing Success

For 8248, a pleated skirt with a tapered waistband. This is View B, the knee length version. The print in the fabric runs horizontally, forcing me to cut it crosswise to get more flattering vertical stripes, thereby limiting the length of the skirt. There are no options to this skirt pattern other than length and an optional ribbon embellishment. The fabric for this make was purchased on-line from Hobby Lobby--an odd acquisition for me since there is a Hobby Lobby a few miles away. However, I was obsessed with finding a python-print scuba knit fabric similar to the one I saw used for a skirt in a Craftsy class but could not find it in any store. The description of this fabric on the website was crepe scuba knit. Instead it is more of a satin, and a big disappointment in texture and appearance. However, for just $9 total there was 3 1/6 yards of a white and black python-print (snakeskin) 100% poly, 58" wide, crepe. Rather than toss it, it made a good muslin for this pattern that specifies crepe in the fabric choices.

Initially, the pleats were difficult, made more so by the fact that the print obscures most markings. Once the first piece was pleated, it all made more sense. The pleats are to be basted down the full length of the skirt, but just sewn down for the top 4 1/2". They are loose pleats, sewn together, but not topstitched down. Of course, the waistband holds them in the correct direction, folded to the center of the skirt front and back. After the skirt is assembled, before hemming, the basting is removed, allowing the pleats to unfold below the top sewn-in portion.

This pattern is not for me. The problems are three-fold: fabric, construction and style. The fabric recommendation is woven, no-stretch. The construction is difficult. The style looks like a cheerleader skirt. While it does have the tapered waistband I am hoping will fit me better than a standard waistband, there is no stretch to allow for all-day comfort.
The muslin is completed as far as the zipper, and that needs to be redone because it is placed a little too high. The pleating is misplaced in the front, taking up too much material and resulting in a smaller waistband than I find comfortable. If there is a second attempt at this, it should be in a different fabric, with the pleats replaced with gathers. The fabric is as bad as a shiny polyester can be. As far as any positive outcome, there is just the discovery that the smaller sizes do not require the specified 9" zipper--7" is long enough.

It took 10 days away from this sewing failure for me to try again. This time, I selected a 58" wide cotton/poly/lycra jersey fabric and a dress pattern, McCalls 8085. I did not order the fabric for this pattern. Rather, I had in mind the simple shift dress from New Look 6458 that I have made before. However, Fabric Mart sent me additional yardage. Since there was 2 1/2 yards of this cut (for $10.50), there was enough for a different pattern. However, the print on this fabric is directional. Once I decided to cut it with the print centered and pointing upward, the cutting became more complex. Of course, my cutting was not error-free. The sleeve was cut in the wrong direction and over a gap in the fabric. It was possible to cut another sleeve, but only one, meaning the sleeves have the print running in opposite directions. In the end, I used every inch of the fabric, which created a problem. I immediately noticed that the fabric piece had two small holes at one end. That is probably why they cut extra. I saw the holes, marked them to cut around them, then forgot them and cut the front bodice over the holes. Now, though tiny, they are near the center in the most visible piece.

Regarding the pattern, I cut a size L and shortened the bodice by 1 3/4". I also lowered the neck by at least an inch. The neck finish is simple, just turning it under and topstitching the hem. Although I much prefer the look of a neckband, in this jersey, the simple hem worked well, especially since I broke out my twin stitch needle, using it successfully for the first time. The walking foot helps a little in this fabric, but not a lot. In the end, I used the standard foot and a narrow zig zag stitch for most seams--quick and easy!

Notably, the shoulders fit perfectly, probably because I followed the instructions and stabilized them. Since I did not have bias binding, I used the selvedge from the crepe fabric to stabilize the shoulder seams. That worked very well. The waist is large and is intended to be elasticized. Doubting that pulling in the 40" waist with elastic would look good, I trimmed the seam. Now I wish I had tried the elastic because it would stabilize the waist seam. The pockets are easy, simple and functional. The skirt length v. ruffle is iffy. A shorter skirt and a longer ruffle would look better proportioned, with the bonus of the seam between skirt and ruffle not hitting my knee when I walk. I cut the shorter option for the sleeve and trimmed it to end above the elbow simply because 3/4 length sleeves usually do not fit my long arms. Once hemmed, though, the straight, elbow length sleeves looked strange on this design. Then I saw a dress in the Pact catalog and decided the sleeves needed a ruffle too.
Using a sleeve ruffle from another pattern as a guide, I cut a 6" deep, 26" long ruffle for the 12" sleeve. That was about as big as I could manage from the remaining fabric. It could have been less deep, as the other pattern, McCalls 7650, had a somewhat shorter sleeve ruffle (5") that was about 24" long.
My sleeve ruffle idea really improved the dress. Also, the holes have been patched and fray-checked.

Friday, April 1, 2022

Alberta Street Pencil Skirts

First version of this pattern by Sew House 7 uses a stretch cotton/lycra twill from Fabric Mart. This was a designer fabric in a deep brown with a wide pattern repeat of large circles. It was heavier and stiffer than I expected, leaving me uncertain as to how to use it. Thankfully, it made a good toile for this pattern, which is intended for a heavy, denim-like fabric. The only problem was matching the print. This pattern that only needs 1 1/2 yards for the size 14--a starting point. Negative ease is recommended, and there is about 30% stretch. While my initial goal was to match the patch pockets with the front, and the motifs across the back seam, I was relieved to get some of the yoke to match the skirt. There was extra in this cut, since they included the end of the bold. There was a little more than 3 yards when I ordered 2 for a total cost of $9. This skirt used all of it, with just scraps left after careful cutting to match the print.
The zipper installation was a simple process made simpler by using scotch tape instead of pins to baste the zipper in place, but I do need a zipper foot for my Janome to get a narrower seam around the zipper. That machine is new and does not yet have all the accessories. As a result, the zipper tape is just barely caught in the stitching. The wider placket looks good in this sturdy fabric but may need reinforcement later. Next were the side seams, in which all the fitting was accomplished. In sum, it is a 14 in the waist and upper hip and a 12 through the rest of the skirt, a silhouette that can be followed on the next cut for a better, quicker way to a good fit in this pattern. The facings and hem were simple, but made better by hand stitching all the facing and some of the hem. In another fabric, top stitching would work and would make a faster finish.

I really like this skirt. It will fit well in my wardrobe and is a perfect match for the cardigan sweater I knit last year. The fabric has a rough feel but is so stretchy it is comfortable for a tight skirt. The one drawback is that the print is easily marked up. The white fabric shows through when seams are unpicked. Luckily, I didn't have to do much unpicking. It will be interesting to see how it wears--I hope it develops a nice vintage patina. The only problem so far is the pocket shape. The opening slants down toward the center front and provides an awkward angle for my hands. The pockets are usable, but not something I would slip my hands into for a comfortable position.

Although I would like to try reversing the pockets, slanting the opening downward to the side seam, that modification will have to wait. My second version of this skirt was complicated by the fabric, a lightweight scuba knit from Hobby Lobby. It is a fairly nice fabric, with a dramatic combination of stretch, weight and drape. However, even though there was no indication that such a fabric was a good choice, it is obvious now even to stubborn me that this pattern was not intended for scuba knit. In fact, scuba knit may not be intended for my sewing projects. It was an experiment that convinced me that I would not be happy with any method to attach the patch pockets in that fabric. The topstitching was buried in the thickness of the fabric. Rather than give up the pockets, I converted them to side seam pockets. The top stitching was completely omitted for a smoother look. One big revelation was that a combination of a stretch fabric with the tapered waistband omits the need for a zipper! However, this one has a zipper. There was no trouble installing it with the appropriate (3/8" is specified in the instructions) placket width on each side because I was using my walking foot to avoid stretching the knit fabric. The sizing is smaller, mostly a size 12, tempting me to try a size 12 allover in a firmer stretch fabric to achieve the recommended negative ease for this skirt. Reversing the pocket shape would be a nice mod as well. There's no photo of the second skirt. It's rather blah and doesn't get much wear. Instead, I happily post another photo of the first one, a simple flat lay so ALL the dots are visible.
I can wear the cardigan with this shirt and the skirt, but would like another shirt to wear with it. Green? Teal? Oh, maybe just brown.

Saturday, February 5, 2022

McCalls 8055, Straight Skirt plus Fold-over Waist and Pockets

The starting point for this sewing project was a pair of pants with a folded waistband and square top-stitched pockets. The pants are by Pact, a clothing company that produces organic cotton garments of all types.
The pants look comfortable, so I thought I would try the same construction in a skirt. Using McCalls 8055, a pattern with a slim skirt and a flared skirt in several lengths, I chose View D because it most resembles a straight skirt that I purchased from The Loft. The Loft skirt is constructed of a stretch knit (french terry) and features a yoke-style waistband that sits below the waist. It is comfortable and flattering.

The pockets are from Butterick 6525, altered to fit the waist of the McCalls pattern. The fabric is from Hobby Lobby, a polyester/cotton sweatshirt knit and a polyester ribbed knit in similar colors, caramel for the sweatshirt fabric and gingerbread for the ribbed fabric. There was 1 1/3 yards of the sweatshirt fleece, 88% poly, 12% cotton, 62" wide, somewhat light in weight. The caramel color is more orange than toffee brown. It was $9 total, but the skirt front and back took only 3/4 yard, reducing the cost to less than $5 for the skirt plus $3 for the ribbed fabric for the waistband and pockets, total $8. The sweatshirt knit has only a little crosswise stretch, but the ribbed knit has at least 50% stretch. With the ribbed fabric for the pocket inset that will replace the skirt front at each hip, there is enough stretch to allow the skirt to be pulled on and off without the aid of a zipper.

Construction was simple and made easier by two factors: first, the sweatshirt fleece is a stable knit that can be sewn with a straight stitch; second, my new walking foot managed the ribbed knit fabric without stretching or puckering. Although the skirt was started with a size 16 to be on the safe side, reducing it by 1/2" on both sides made it fit. A second skirt in size 14 fit well enough. Basting most of the seams prior to sewing made the process of sewing, fitting, and re-sewing easier. Once the skirt was constructed, however, the waistband construction was simple. It is just a tube, folded over and sewed to the skirt with a zig-zag stitch for stretch. That seam is covered by the waistband being folded up toward the waist, so the uneven line of the zig-zagged seam is not visible. Next, a casing was sewn in the middle of the waistband for a drawstring. The waistband folds over the drawstring. Since I do not wear tucked-in shirts or crop tops, most of the waistband will never be visible.
The rest of the skirt that is visible is near perfect--it fits well; it is quite comfortable; it doesn't ride up; and the pockets work. Below is a photo of the non-visible portion. It looks quite neat. The only two things that were improved in the second version were the holes for the drawstring. Two zig zag stitched rectangles, each a half inch to either side of the center of the front layer were sewn in before the waistband was attached to avoid hand-sewing after the attachment; and the slit on the side--it started a few inches higher up.
The skirt is a good match for the sweater I knitted last year from the Graphic Elements pattern by Tamy Gore. It was mentioned in my end-of-year sweater post. The second version was made from some peachy-pink sweatshirt fleece and ribbed knit fabric. It looks ok with the mauve sweater also featured in that post, although it's a lot of pink.

I have since made a third version of this skirt, using Robert Kaufman cotton/lycra sweatshirt fleece in a deep green, Cedar. This one is my favorite--cotton beats polyester in this case. Also, it doesn't shed as much as the first two do. The excessive shedding of the fleece fluff from those skirts forces me to wash them separately.

Friday, January 28, 2022

McCalls 8064, View B

View B of McCalls 8064 is the midi-length v-neck dress with long sleeves. This version was inspired by a dress I bought at Gap that is showing signs of wear from heavy use. Making the dress used 2 3/4 yards of 60" wide rayon/polyester/lycra blend gray brushed sweater knit from Fabric Mart for a cost of $12.25. The fabric is more a brushed jersey than a sweater knit as the actual fabric is just a single knit jersey with no texture. At more than 5 ounces/square yard, or 175 gsm, it is quite warm, while soft and very drapey.

The smallest size in the pattern I have is a large. Although I was sure that would be big enough, I cut the L and cut the waist at XL, adding additional (probably a little too much) figure-forgiving volume. Once I set to sewing, I realized I had repeated the mistake I made last spring when I attempted to cut out a skirt from a pattern that had several different lengths on each piece. I actually cut different lengths for the front and back. In this case, the front pattern piece had two lengths marked and the back had three lengths marked. Since I cut out the back first, I correctly cut the second to the longest length. Cutting the second length on the front meant I cut the shortest length--there were only two lines. If I had double checked myself, I would have had enough fabric to cut the correct length for the front, but I was distracted by concern that there was not enough fabric for the neckband. I was really determined, however, that this dress be longer than the Gap dress. (I have always thought that one too short for winter wear.) Even though my mistake was in the front, I pieced the front so that it is long enough. The brushed knit and heathered fabric almost hide the seam. Still, I am so upset by this mistake, mad at the pattern company for drafting two inconsistent pattern pieces and mad at myself for not catching my mistake. The cut lines are correctly marked. I just did not register the fact that one was B and one was A.

My other (desirable) modifications, reducing the depth of the v-neckline and adding side seam pockets, worked well. Having learned from my last experience sewing knits, I began the side seam by basting it first, checking the fit and then sewing it with the knit stitch. After sewing I trimmed the side seam. I avoided the extra step of trimming on the pockets by sewing both basting and final knit stitching of the pocket seam closer to the edge so that no trimming was needed. I removed the basting from side seam but not from pocket seam, reasoning that the pocket does not need to stretch and might be reinforced by the basting.

Setting in the first sleeve and a quick try on showed the shoulders to be too wide, and possibly, the sleeve cap too short. Also, after gathering the sleeve and basting it in place, the fit was way too tight. The instructions do not call for easing the sleeve into the armhole, even though the sleeve is larger than the armsyce. Since the sleeve was just basted, it was easy to rip out. After recutting the shoulder and setting in the sleeve by stretching the armhole to fit, the shoulders are a good fit--no sleeve cap adjustment was needed.
Now that it has worn and washed it is obvious that this dress is a small success. The brushed fabric did not pill after washing and the seam at the bottom front is less noticeable after washing since the brushing is more fluffy now. The cut is not flattering, however. The next one needs to be smaller overall with more waist definition--in another sweater knit if possible.

Wednesday, January 19, 2022

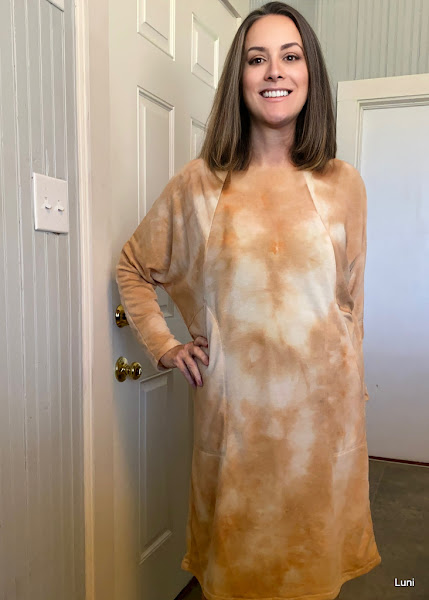
Butterick 6525, a dress featuring dolman sleeve with pockets

The fabric recommendations for this pattern include French Terry, Sweatshirt Fleece, Interlock, Ponte, and Jersey. The french terry in my fabric stash was purchased from Fabric Mart, 2 yards of an apple cider/off white tie dye style print on a polyester/rayon/lycra french terry, 61" wide. It is lightweight for a french terry and has more stretch than needed for this pattern--the pattern recommends a "moderate" stretch of 35%. 

It was cut as it came, no washing, since it will be washed on cold and hung to dry. Although the length was a little over two yards, there was not much left over. For the large size, which is the smallest option in pattern I purchased, the longer sleeve version of the dress requires 2 1/8 yards. A large white splotch in the fabric complicated the cutting, but I managed to cut around it, mostly. All pieces were cut to a size L, except for the sleeves, which were cut longer--to the XL length, but shortened by 3" before hemming.  A neckband from another pattern (New Look 6458) was cut out, since other sewists have objected to the turned hem at the neck. 

The sewing was tricky.  As noted (thankfully) by others who have used this pattern, some of the notches do not match. The sewing is further complicated by a lot of top stitching that, although it could be omitted, does highlight the diagonal seams in the front and back. Since the sewing is complex, basting the seams first is advisable. The pattern is marked to denote the beginning and ending of the pocket opening, but there are other marks along the same seam line that confuse that denotation. Since I was using the lightning stitch to allow for some stretching along the seams, ripping out when I used the wrong mark was quite tedious.  The lightning stitch, with the width shortened and the stitches lengthened, works for top stitching, while the "knit" stitch, with the width shortened slightly, works well for seaming if the seam does not need to the pressed open. However, the knit stitch, which looks like _/_/_/,  really would be difficult, if not impossible, to rip out. After sewing the side seams with a 5/8" seam, there is a little extra ease on each side, more than I need for a drapey knit. The only problem with the side seams is making sure the top stitch seams around the inserts and pockets line up in the side seams. Oh, for a serger--and something that marks french terry easily. Regular chalk markers just do not work on the rough wrong side. 

--later--Now that I have purchased a walking foot, sewing this fabric is much easier. A felt tip fabric marker works well for the marking.  The top stitching went well, using the lightning stitch on a .5 width and a 5 length. The only problem was that the double row of top stitching around one of the pockets did not intersect with the top stitching in the side insert. That was a miscalculation that I need to avoid when I make this pattern again. It could be avoided by starting the top stitching at the insert rather than the bottom of the pocket. This fabric is too soft and drapey for this pattern, not surprising due to the rayon content. It was somewhat sheer, but a cool wash and slightly warm dry in the machines tightened it up a bit. Now it is just soft, not great for this pattern, probably good for a top. Although it is stretchy enough for leggings, it will not stay in place and slips into wrinkles at the slightest touch--not a good look for leggings.  It is disappointing that the fabric and the pattern are not a good match.  The first knit tie-dye fabric I purchased was a rayon and poly blend that is the heaviest knit I have found, outside of the jacquard. Assuming that all rayon blend knits would be heavier knits was a mistake. This one is less than 200 gsm. Most true french terrys, especially the ones with cotton in them, are closer to 400 gsm. It all goes to prove that not all french terrys are the same. Lesson learned. 

The neckline in this pattern is simply turned under, without a band. Using the instructions New Look 6458, I added a neck band. It looks good, especially since the top stitching echoes the original design. It definitely adds structure.  Next time, I would cut the front neck a bit deeper, or the back neck a bit higher when I make this again.  The front neckline sits too high on my neck. The fit of the L size is good. The shape is flattering, tapering to a narrow skirt. This would be nice in a heavier fabric, perhaps with a closer fit.

In a more stable fabric, the shape and seaming would be highlighted.  In the meantime, this one can be shortened to a top and worn with the corduroy pinafore I made last summer--once I get the nerve to cut it off.
I really like those pockets, they are worth the extra trouble.  If you think using the wrong french terry was a big mistake, wait till you read about my next make.  I sometimes wonder if I will ever sew a knit I can wear out of the house. However, as limited as my outings are now, that is a question that can wait to be answered.