Sunday, March 30, 2025

A couple more McCalls 7122

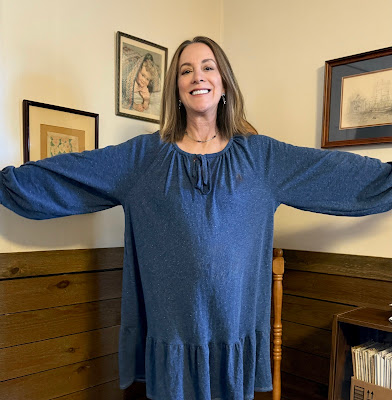
Finally, in the knit dress closet restock, there is McCalls 7122, a pattern that I have made up before in a long sleeve version.  Raglan sleeves have always fitted my shoulders well.  Besides that, they are easy to construct.  The first version was cut from 3 yards of Prussian Blue Poly/Lycra brushed sweater knit.  The fabric is exceptionally soft, but pills after washing.  At least, the pants I made from it a couple of years ago have pilled.  There was ample fabric at 58" wide.  It was another Fabric Mart bargain at a mere $3/yard.


Pilled or not, it will be an easy one to wear and will look good with an overshirt.

This photo is more true to color--a navy blue that will coordinate with a lot of my shirts.


After finishing this dress, the black shirt I used to practice coverstitching began looking much better to me.  Washing made it look so much better that I finished coverstitching the neckline and put it back in my closet.  After washing, the coverstitched hem on the ruffle did not warp or bias.  However, the turned under edge of the sleeve ruffles shows a little biasing.  It may just be that the sleeve ruffles were cut off grain.

There was enough of the 100% cotton black tissue jersey left to make a black version of this dress.  The neckband is still a bit loose, but it will fill that knit dress gap in my closet.


One problem with the neckline is that for me this pattern should be smaller on top.  I don't have the medium size block, just the large.  There's a gap in my pattern collection!   

Coverstitching the neckline did not help with the fit.  It just taught me that I unable to trim a neckline edge after coverstitching without cutting the stitching--need to trim before coverstitching!  Although serging the neckband on and coverstitching over the serged seam would be the best approach.  However, the coverstitched hems on this dress look good and were very easy to construct.

Thursday, March 20, 2025

Simplicity R10180 and a Twice-used Toile

The knit dresses for summer project continues with a 3/4 length sleeve dress, cut from 3 yards of gray cotton/poly/spandex interlock purchased for $28.73 at JoAnn's.  After cutting, there was about a yard left.  There is also a 32" piece of the same fabric found in the remnant bin for $2.34.  With the two pieces combined, there's probably enough for another dress, or at least a t-shirt.  I will miss JoAnn's remnant bin.  

The pattern is a simple dolman sleeve dress or shirt, Simplicity R10180.  This is one of their "hacking" patterns that offers several suggestions for gathering the sleeves or side seams.  In the back of my closet I found an old wearable toile from another dolman dress cut from Butterick 6525.  It is well-worn and headed for the discard pile.  Since it is similar in shape but several inches larger in the side seams, it served as a toile for the Simplicity pattern.  Once it was cut to pattern dimensions and resewn, it looked like a medium would work.  So an old toile became a new toile.

Construction was surprisingly simple and quick.  The dress was done in a day, probably 2-3 hours total.  There's just 2 pattern pieces.  

Since it was the first time I had made a dress from this pattern, I changed from narrow zig zag to basting stitch after the side notches on the body.  After a try on, I narrowed the seams to 3/8" from 5/8" from the notch to 8" below the notch for a little more ease and pulled out the basting.  In the future, I would just repeat that adjustment or cut that area a little wider in the front.  Once I make that adjustment, I can use lightning stitch or the serger for all the seams. 

Up until now, the hems were sewn with a twin needle, with mixed results.  Really, a twin needle works fine on some fabrics that don't do well with a simple topstitched hem or even a blind hem.   However, most knits tunnel with a twin needle.  Some finer gauge knits both tunnel and bias against the stitching.

Above is an example, a shirt from a couple of years back.  It didn't look too bad after hemming, even with the bit of tunneling.  Over time, the hem biased.  Whether it is due to the cutting or to the stitching will be determined now that the twin needle hem has been replaced with a coverstitch hem.

As mentioned in my last post, I have a new coverstitch machine.  After coverstitching the hem of my recent Roscoe dress, I decided I could use more practice.    Besides not being instant magic, the coverstitch machine takes much more practice than the serger.  It works well, but since the hems are visible, it is important that the stitching be straight and evenly connected.  With a serger, the stitching is hidden inside the garment, along with any uneven or crooked stitching.

Above is the new hem on the old shirt.  Once it is washed, we shall see if it biases.  The neckline of the old shirt was replaced with a neat new neckband (I have more of this fabric, as you will see in my next post.) that was coverstitched down.  It would have worked out well but the fabric has only mechanical stretch, no recovery.  The neckband stands up a bit too much.  That's one more reason to throw this worn-out shirt away--after I wash it and check the hems.

The coverstitching was acceptable, but it is not magic.  It doesn't change the basic characteristics of fabric. The hem of the Roscoe dress is turning up, as does every 5/8" or narrower hem I do.  Ah, well.  (A quick fix is to put clothespins on the hem when it is hung to dry.  Then iron it.  Even if you dry it in the dryer, putting the clothespins before hanging and then ironing before wearing helps.) However, I have found that the coverstitch machine is more intuitive and easier to understand than the serger.  I have never threaded my serger.  It came threaded, so tying on a new color and pulling it through the machine, then threading the needle is all that I have had to do the change thread. I planned the purchase to avoid threading the serger.  

I thought I might be able to treat the coverstitch machine the same way, avoiding the difficulty of threading.  I purchased 4 spools of thread at the dealer and persuaded the sales associate to thread the machine while I watched.  Then I carefully packed it and brought it home threaded.  My luck didn't hold.  I was forced to re-thread the looper when it came partially unthreaded.  Fortunately, I was able to follow the guide in the manual and remember what the sales associate demonstrated.  I have also had to thread it for 2 needle coverstitching and then back to 3 needles.  However, the needle thread follows a simple pattern through the color coded guides across the machine.  I think that coverstitch machines are much like sewing machines, except that they have more needles and the bobbin is replaced by a looper.  As a result, they seem much easier to thread than sergers. 

For this pattern, the cuffs, hem and neck are all just turned under and sewn down.  With my Bernette 42, I coverstitched them.   The gray ITY knit is easy to handle and hem.  My only misgiving is the dolman sleeves.  They do wrinkle.

Friday, March 14, 2025

Roscoe in Jersey Knit

Last May, I made a note that I was looking for light, short sleeved or sleeveless dresses in knit fabric to wear all summer.  Couldn't find any in my closet.  Fixing that omission:

The fabric is 100% cotton heathered dark cerulean/multi blue Jersey Knit,  52" wide, $6/yard.  They were to send 3 yards, but Fabric Mart sent more by mistake.  The fabric was probably knit in a tube.  When it arrived, it was full of sizing and pressed into the usual fabric dimensions.  After washing, it became a shapeless mess, floppy with no apparent grainlines.  It did not look promising enough for a dress.  After an attempt to make a t-shirt from Simplicity 9272 proved that the fabric stretches out very easily but has no recovery at all, it went back in my stash, along with the failed t-shirt.  

The crummy looking t-shirt proved useful.  It served as practice material for my serger and later for my coverstitch machine.  (That's a recent acquisition that will be discussed as soon as my experience develops sufficiently.) The more useful the crummy t-shirt proved to be, the more convincing it was that the material was good stuff.  The fabric must be on grain on the right side.  The grain on the wrong side appears to bias across the fabric, but the knit stitches on the right side, tiny though they may be, are fairly vertical to the cut edge that has been treated to form a fake selvage.  

With the grain line crisis resolved, pattern choice was on the table.  After some consideration, it made sense to use the Roscoe pattern, even though it is not meant for knits.  It is comfy and forgiving and has raglan sleeves that are simple to construct.  The knit fabric justified cutting a size 8 (my first Roscoe was a 10).  (Sizing down for knits is standard when adapting a pattern written for woven fabrics.)

The pattern was cut to view A, which is used for both the short dress with a ruffle and for the blouse.  That meant removing the additional 2" I had added to the body pieces.  The resulting extra fabric allowed and me to add 3" to the sleeve. 

Using a ball point size 12 needle and the lightning stretch stitch, I sewed the facing on the neckline slit and assembled the blouse (sleeves, front and back).  I have decided to serge the seam allowances once I am reunited with my serger.  Or not.  They seam fine, ha ha

Next I gathered the neck and sleeves and sewed the binding on them with a narrow zigzag stitch, trimmed the seam allowance and hand stitched bindings on the inside.  Since I never have had luck with catching the binding on the wrong side consistently when stitching in the ditch, I prefer to hand stitch the bindings down on the wrong side.  Using the coverstitch machine to sew them down would be an option once my coverstitching skills improve.  Finally, I cut the ruffle pieces and coverstitched the hem before attaching it to the blouse, making it a dress.  

The top is 54" wide at the hips.  This pattern is huge.  How small a size should I cut? Even the size 0 is 44" wide.  A flowy, boho look works with a light cotton and with this soft jersey.  Other fabrics might need to be a size or two smaller.


maybe 3 or 4 sizes smaller?

So that is a dress in a light knit fabric.  Next is a short sleeved one. Then a 3/4 sleeve short dress.


Sunday, March 2, 2025

My 2024-25 Sweater: Jethro

It's true that I am now making only one sweater each year.  This one spans the calendar so much that it may count for two years.  I began this sweater in late September 2024.  Initially, I was attracted to several design features--boho, loose fitting, a combination of crochet and knitting--those points were in its favor.  Again, initally, I was put off by the name.  It only reminded me of the character in the Beverly Hillbillies.  Once I read the designer's description and watched her videos, I realized how wrong I was and how right this name was.  Jethro Tull was and still is one of my touchstones.  I have the original vinyl record and often play it, as long as I play Aqualung among the other songs.  I renamed this sweater "Aqualung Blues" and made it mine. 

I already had the perfect yarn, a cotton blend from Noro.  The cotton is blended with rayon and silk to give it more drape and with nylon to make it softer.  I bought a group of blues and gray colorways in 2021 to make the Oma Goodness top.  Those colors got re-routed to Jethro, but there's probably enough of them left to do the top.  The granny squares don't use a lot of any one color.

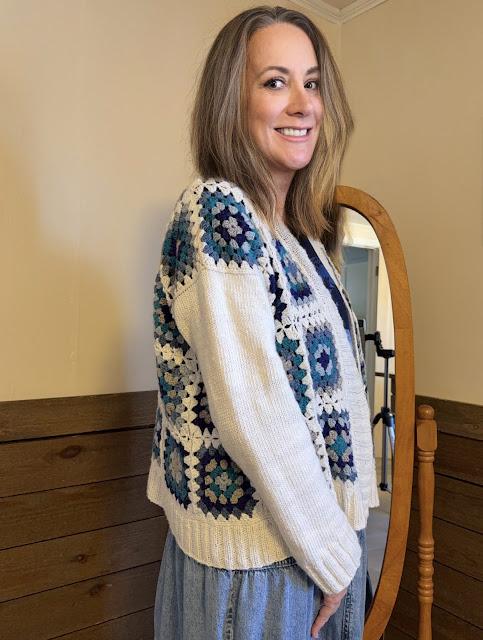
There's about 40 granny squares crocheted together, with only the sleeves, hem and buttonbands knitted.  I like it, even though it's not one of my usual hand knitted projects.  The pattern, Jethro by Tanis Lavalee (available on her website) is clear and simple enough.  My only complaint is the drop shoulders--although it's not a design feature I favor, it is one that works well with granny squares.  

The squares crocheted up quickly.  I finished them by the end of October. Joining them all together only took a couple of weeks (keeping in mind that I only work on this project about an hour a day). Then I tried to make it just a bit larger.  You see, this was sport weight yarn and the gauge was a bit smaller.  I thought it could use a little more ease and wanted it to match the specifications of the size 3 Jethro.  I also wanted to change the shoulders a bit.  I got an idea to alleviate the drop shouldered, wider in back, narrow in front effect by adding squares below the armholes with small triangles above them for shaping.  I reasoned that change would improve the fit and provide a little more fullness in the front.


It made a more traditional armhole, one that resembled something that would fit a shaped sleeve cap. 


While the additional squares under the arms made the sweater meet the size schematic dimensions, they did not change the shape of the sweater.  It is obvious that a sweater made of granny squares is mostly square--or rectangular.


Since the rounded armhole is shaped like one that fits a sleeve with a cap, I added a sleeve cap.  Failure.  All the cap did was add extra fabric that made the shoulders stick out. I ripped back and tried adding a gusset at the bottom of the armhole.  The first gusset had the usual decreases on every other row.  That wasn't enough, so I replaced it with paired decreases on every row.   


After the gusset, I decreased the sleeve circumference further with decreases on either side of the end of round marker.  The drop shouldered boxy look needs narrow sleeves to offset the oversize style.

The gussets under the arms allow for the narrow sleeves that offset the wide body, as well as providing room for a sleeved top under the sweater.


Once the sleeves were complete, I finished the simpler knitting--the hem and button bands-- quickly.  The end result is quite satisfactory.