Saturday, December 31, 2022

Vogue 8952, View B and View A

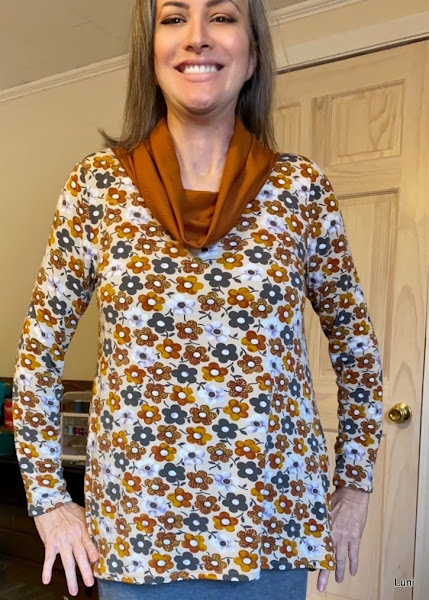
For my last sewing project of the year, it is appropriate that I chose a fabric that I had been wanting for the entire year. Each time I looked at those photos online, I tried to vanquish my enthusiasm for them. Whether my reasoning was "Too bright"; "Too childish"; "Can't tell how it feels"; it was all no avail. I bought 1 1/2 yards of the daisy floral printed stretch rayon jersey knit in Earth/Orange/Mustard/Gold, 49" wide, for $25.50 from Fabrics and Fabrics and I am so glad I did.

It made a perfect first try of Vogue 8952, view B, size M. After testing several stretch stitches, I used a narrow zig zag (10/1.5/1.0) and the walking foot. Although I basically followed the instructions, I changed the order of construction, sewing in the sleeves before the cowl neck collar to avoid an extra change of thread.

I chose a contrasting ribbed knit for the collar, not only because I was a little short of fabric but also because the print on this fabric gives it an obvious right side. At the time, I didn't realize that the collar is doubled to the inside after it is sewn on, so no wrong side shows. However, the collar is only tacked down in the back. The right side on the ribbed knit is not as obvious and will make a better collar in case the collar doesn't stay right side out all the time. The collar is all one piece, sewn together with a flat fell seam. Although the fabric has stretch, straight stitch is all that is needed for this flat fell seam since the seam has no stress on it that would require stretch. The technique I used was to stitch the seam with one allowance longer than other, wrong sides together, then fold the longer seam allowance over and topstitch it down. After the collar is attached, it is topstitched down with a straight stitch. That should prevent the neckline from stretching out too much.

The sleeves and top were both hemmed 1" shorter by cutting off 1" and then turning under 5/8" for the double needle hems. The length is a little long for my style, but it won't show once it is tucked in or worn under a skirt or jumper. It can always be shortened, so best to leave it long for now. (Note: It wouldn't hurt to alter both hem and sleeves in the pattern to remove 1" of length.

Ahem -- Ok, brace yourself, it is a lot of print. Sorta my fireworks for the day.
This fabric is wonderfully soft and suprisingly thick, truly quality material. Since it may stretch, as my other rayon knits have done, it must be dried and stored carefully.

Regarding the pattern, I like it. Overall, I am happy with the fit and would make this pattern again. If I do, I need to remember to do 3/8" seams between notches at waist if I want the same fit. I was a little put off by the points on the sides of this view, but they were surpisingly easy to sew and don't look bad. Most likely, no one will see them as I will probably be tucking this top in, wearing it under a cardigan, or under a jumper. It can use a little plain contrast. It will work well to liven up my dull skirts and jumpers, though.

Here's the side point:

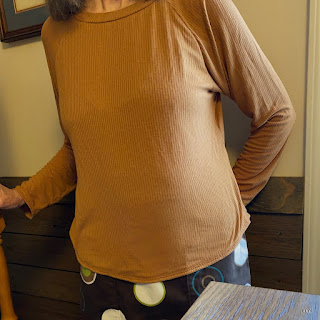
Eventually, I hope to try all three views of this pattern. Toward this goal, I made View A, the raglan with the banded neckline in an ochre rayon ribbed knit.   I was excited to purchase this fabric because the color and fiber content were to my taste.  I bought 2 yards of a 61" wide ribbed knit, 96% rayon 4% spandex, from Hobby Lobby (hand wash, cold, lay flat to dry, do not iron).  It was on sale 66% off, total $10.19.  My excitement stemmed from my favorable experience with wearing rayon knits and from my plan to work more brown into my wardrobe. Brown is terribly hard to find in the fabric world! Once I started handling it, I became concerned that the fabric is a bit too thin.  However, it all went together without mods until the hem.  It was too long for the skirt I plan to wear with it.   I cut off 4" and recut it to the same lines as a RTW top I had purchased from Gap.  I am hemming the curved bottom and the sleeves with the visible hem stitch set on 5 and 3.5, making for a very nice and stretchy hem. 


In spite of the fact that the raglan is too roomy in the armholes and has that dumb dart at the shoulder that I don't see in RTW raglans, I really like wearing this top.   There is still View C to make, but I am hesitant to try the dolman because it is normally harder to cut out.
Monday, December 26, 2022

Two Versions of the Lodo Dress by True Bias

A quick toile of the Lodo Dress took less than 1 1/2 yards of ITY in Potting Soil, one of my favorite JoAnn colors. I was able to order 2 yards (their minimum for shipping of fabric (57" wide, 60% cotton, 40% polyester, machine wash gentle cold, dry flat, cool iron, total $14.98), enough for either length of the Lodo Dress. After a spin in the washer and dryer, it lost 2" per yard, thus was only 1 7/8 yard, maybe 54" wide. I knew I wanted a below-the-knee dress, so I took 2" out of the length for view A, later using another 2" in the hem. One half of a yard remained after cutting the front and back. The facings are cut from 1/2 yard of a cotton paisley print fabric from Hobby Lobby (only $3 after 40% off, with a good bit left over after the facings were cut).

The center back and shoulders were sewn together with a stretch stitch, 09/1.5/3.0. There's no ripping that stitch out, but it looked the best of several zig zag options I tried. Facings were applied per pattern, but I did pink the edges, clip, and understitch them before basting them down. Then I used double needle topstitching on the facings, the back vent, and hem for a more professional look. The side seams are sewn at 1/4" instead of 3/8" for now. It may shrink more with wearing and washing. If not, it could be taken in.


The shoulders do not fit well, resulting in drag lines from the bust to the hip. If this doesn't resolve over time, I won't make another Lodo Dress. However, I wouldn't hesitate to try cutting the pattern back to shirt length, if I can resolve the fit issues. There's not a good cap sleeve knit top pattern in my stash.

The second version of this dress used a novelty fabric from Fabric Mart. It is 1 2/3 yard of a wild red ruffled knit, 56" wide, costing $4.20. As required by the pattern, the dress needed 1/2 yard of a printed cotton fabric for lining. This fabric is a poly/cotton blend. While the fiber content is similar to the content of the fabric used for Version A, these two knit fabrics are quite different. The ITY is a stable knit with minimal stretch. The ruffled knit is stabilized by the woven-in horizontal pleats. Without the horizontal seaming to secure the pleats, the fabric would be very stretchy and quite sheer.

Since the first version was cut on the size 10 lines, this one was cut closer to a size 8. Actually, it is a size 10 at the back shoulder and in the hips, between the two sizes at the bust, and a size 8 down to the hem. After lengthening the dress by two inches, the hem was cut to the shorter version, View B. The fabric is easy to sew, in spite of its texture. The pockets added as an afterthought were a bit difficult.

The problem was solved once I decided that pockets cut from woven material should be overcast around the edges. Once they were and the placement calculated, the actual basting and sewing were easy. Thank goodness, for the pockets are cute and convenient, especially with the printed lining fabric showing a bit. After wearing the dress, the pockets proved useless for anything heavier than a hankie. Everything else just falls out in this soft fabric.

The hem required that the pleat in the back of the fold be stitched down to prevent it from hanging down below the hemline. Once that was done, a simple topstitching was all that was required. Horizontal topstitching along the woven-in pleat lines practically vanishes in this fabric.

It is quite a success. Now that it's done, it seems that red dresses are popping up everywhere. Must be a trend!

Wednesday, December 21, 2022

Roscoe Dress and other pattern difficulties

Pattern difficulties are rare for me. Mostly, there's nothing in the simple sewing patterns that I attempt to assemble that puzzle me. If there is some piece or instruction that doesn't fit, it can be worked in, or worked out, one way or another.

Most likely, the fault is my tolerance. There's always anomolies, some that I tolerate, some that I don't. My issues with the toile of the Roscoe dress pattern are minor. The fabric is 4 yards of a 100% cotton twill. (Brown Herringbone Cotton Calico, 44" wide, 4 yards, $19.56 at HL after 30% off, plus 33" of same, in a sierra red purchased as a remnant for $3.84.) This is very light, would be good for hot weather. That should be enough for the dress, in fact there should be about a half a yard left over. Since I had nearly a yard of the same fabric in another color, I was hoping to get both the dress and the short sleeve version of Vogue 8877 out of the total 4 1/2 yards. The anomoly in the fabric is that it shrunk to under 40" wide after washing! That's what I call short of fabric. The anomoly in the Roscoe pattern is that the straight lines do not match a straight line. They are not off by much, but they are off. What could cause this printing problem? Tissue paper? wrinkles? humidity? a crooked ruler? I don't know. With these little issues, this project was kinda getting on my nerves.

My work arounds were: cutting the front of the dress on the selvedge edge;(Yikes, I know, I am reckless.) and cutting the back ruffle a couple of inches narrower than it should be. Even though the sleeves could have been a little longer, I settled for just adding 2" to the 3/4 length sleeves to get them to be long sleeves. After all that, there was only about 3/4 yard of uncut fabric left.

Once past the cutting, there was the pattern itself. The neck band is cut on the bias but the sleeve bands are cut cross grain. The neck band stretched out to be a couple of inches longer than the the pattern piece. Perhaps it would be better cut cross grain? Either way, both the neck band and the sleeve bands wriggled out from under the needle when I tried to stitch in the ditch. That was a frustrating process, with a lot of starts and stops to secure the folded bands. With the band and the added length, the sleeves are still short, so a proper cuff would be good, or enough length to allow sewing a casing and putting elastic through it to avoid gathering. Another issue is that the folded and sewn down ties attached to the neckband twist. The folding and sewing was a bit of a surprise. Usually these type of ties are sewn from the wrong side into a tube that is then turned right side out with a bodkin. Alternatively, the entire neckband and ties could be replaced with a casing twill tape. That would avoid gathering.

Regardless of these small issues, the dress is good, especially in this fabric. It has enough drape that I could have cut a 10 instead of an 8. However, I prefer that the Roscoe, with its lack of pockets and lack of pizazz as a dress, should just be cut as a blouse. In that case, the size 8 it is now cut to will work well in a variety of fabrics.

Next came Vogue 8877. First there was the toile, the first time I attempted the pattern. This pattern does have a lot of ease and could have been cut smaller. However, the size block I have starts with a large size. Truthfully, the large is probably the best size, as long as it is cut a bit smaller in the bust and on the cut line at the hips. The only fit issue with the large size for me is that the yoke is too deep. After the toile, I adjusted the yoke to be an inch shorter. Using the the remaining brown fabric plus a little less than one yard of the same fabric in an unfortunate pink/orange (salmon) color was enough for a second toile of Vogue 8877. Less than one yard of each color is not really enough, forcing me to cut a yoke and a body of each color and mismatch them--the front has a salmon colored yoke with a brown body while the back is reversed. Since there was more of the salmon fabric, the back is cut a couple of inches longer than the front.

That's the big reveal. I think it is cute, and that Vogue 8877, for all my angst, is just fine. The only thing to discourage repeated sewing of this pattern is that color blocked patterns mean changing thread, if I care to match thread color across colors. In the end, my sizing insight from this whole experience: for patterns that must fit on top, buy the smaller size and adjust the bottom. For ones that must fit on bottom, reverse that, and buy the larger size. In sum, buy larger sizes in skirt patterns and smaller in tops and adjust accordingly.

Monday, December 5, 2022

McCalls 7981, View D (new) and View A (toile)

Warning: The waistband on this pattern is 4" longer than listed on the pattern piece. Although it matches the other pattern pieces, it is larger than the lengths in the size chart. However, the discrepancy between the size chart and the pattern pieces can be accounted to ease. If you don't want ease at the waistline, size down. Do not refer to the measurement printed on the waistband, at least in the L-XL sizes. I prefer elastic in the back of my waistband and use the larger size to allow for it. However, it is nice to know after sewing the toile that I don't need the size XL in this pattern.

Another revelation from sewing the toile is button placement: Reviews of this pattern report a problem with gaping between the top two buttons. That problem ocurred with my flannel toile. It's because the buttonhole is placed horizontally on the waistband and vertically on the button band. In that case, the head of the buttonhole on the waistband should line up with the buttonholes on the buttonband, allowing the button to slide all the way over and still be lined up with the other buttons and the button band to align with the buttonhole band. In the toile, I centered the waistband buttonhole over the button band buttonholes. That didn't work because the pressure at the waist will make the button slide over the the head (left side as worn) of the buttonhole. The simple fix was to move the button over so that the bands align. However, on this and subsequent versions, I will place the waistband buttonhole further away from the edge of the buttonband and make sure the button is sewn in the correct spot to allow it to sit at the head of the buttonhole and still be lined up with the other buttons. Still, a fastener at the bottom of the waistband might help line up the button band with the waistband.

About a year ago, I made a wearable toile in this pattern, using View A, with an additional 6" in length. That made it between View A and B. I cut a size XL, even though L would have been large enough. Since there are only two sizes in the size block I purchased, it made sense to use the larger size for this wearable toile to allow for alterations and to take advantage of the drape of the fabric. This length used the full complement of 7 buttons, plain off white ones that were left over from a sweater project.

The fabric was purchased at JoAnn and was 3 1/4 yards of cotton flannel in a printed plaid, 44" wide, $11.90. After machine washing and drying, it shrank to 40" wide and 3 yards long. There is at least a yard left over, so the actual cost is nearer $8. The contrast fabric is a brown Buffalo plaid flannel remnant from JoAnn (161008103, 3/4 yard, 86 cents).

All pieces were cut out with the fabric flat, except for the back which was cut on the fold, folded along a vertical stripe. Nonetheless, the plaid matching was difficult and is not as good as it should be. Matching the pockets to the exterior fabric, which meant cutting two of each fabric, did work well, since the side seams sit at an angle and the pocket and side plaid pattern can not be matched the full length of the seam. Matching the front button bands to the front panels was close--the horizontal lines of the plaid match and the vertical lines would have matched if I were happy with leaving the seam of the band that the buttons are sewn to exposed. I was not, so the plaid misses matching vertically by 3/8".

The hem method was a simple blind hem 1 1/2" deep with the button band folded over the hem. I put tailor tacks in the button bands to mark button and buttonhole placement. However, the 1 1/4" buttonholes were adjusted to the button size to 1 1/8" by the machine and the placement is 3" apart. The tailor tacks, which took some time, might not be necessary, especially in a small plaid like this one, where the buttons can be placed along the lines of the plaid.

There is a little extra fabric in back waistband that is taken up by 14" of elastic which is sewn down at the sides (where a side seam would be). The elastic could have been a little shorter, but not any longer than that. Adding the elastic made it a 32" waistband.

The buttonholes were very quick and easy on the Janome. I will be looking for more patterns with buttonholes now. The buttonholes in the beige thread that I used for the skirt are quite obvious on the plaid. Black would have been a better choice since they run down the black/gray stripe. It is a relief that they are even and tidy, since uneven buttonholes would have been noticeable.

Even with the difficulty of plaid matching and button bands, it is very likely that I will make this pattern again. I have just the right amount of tan linen to make View D, no matching required.


Now for the second version, a size L cut from view D, but 3" shorter. This used 2 1/2 yards of 56" wide linen, in beige, nearly 6 oz. (5.88) per sq yd, so it is heavy. Cost was $32.38 from Taos Adobe Quilting. It washed and dried beautifully, even smoothing out some variations in the weave that were like slubs. There was just one large slub that hangs ominously from a tiny hole at the lower back of the skirt. With a dab of fray check, it may stay put and not fray. This fabric does not fray as badly as a thinner linen does, but it still frays, leading me to overcast stitch the unenclosed seam allowances. It is too heavy a fabric for french seams and too light in color for a contrasting Hong Kong binding finish that might show through to the front. (In my view, a Hong Kong finish isn't worth the effort if you can't use a cute contrasting material.) Assembly was much simpler without having to worry about matching plaid patterns. After stitching the back seam and side seams, including pockets, the the hem is next. Wait, what?

The hem is sewn before the button and buttonhole bands are attached, simply because they are turned under around the hem. Although the different order of assembly is not difficult, it precludes the ability to hang the skirt, letting the fabric stretch into place, before hemming. As a result, the hem may look a bit uneven. However, the fullness of the skirt may disquise most problems.

After the waistband is attached, there is slip stitching--down the bands, around the hem and around the waistband, about 6 yards of hand sewing. Actually, the hem is supposed to be topstitched, but if you're slip stitching everything else, why not the hem?

The waistband is a puzzle. Even after stay stitching the skirt at the waist, the waistband is too short. Perhaps if the stay stitching is done immediately after cutting the fabric, it will reduce the size of the waist. However, the instructions put the stay stitching off until the skirt is assembled. At least the stay stitching can be used to ease the skirt into the waistband. Finally, putting elastic through the back waistband brought the 36" waistband in to 32-33".

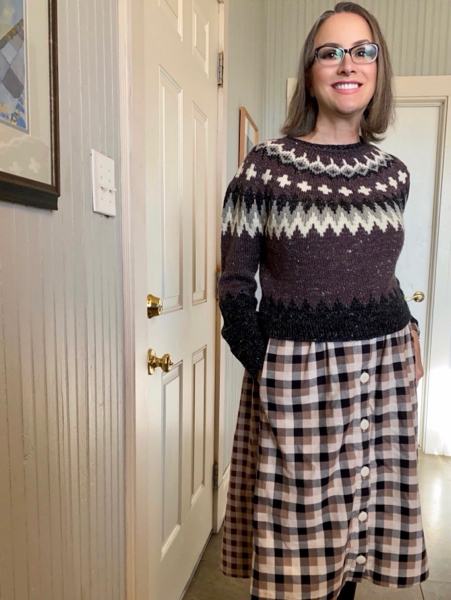
View D is quite long, would be a maxi skirt on me, so I cut it 3" shorter. The result, at 31", it is a little long. It is recommended that a skirt hem hit your leg at the narrowest part in order to be flattering. (!?Flattering in what way, should it make your leg look thinner or more muscular?) For me that would be 28" for a below-the-knee length and 34" for a maxi skirt. The buttons I have chosen are smaller than required, but I have them, they match, so on they go. The eight buttons are 3 1/2" apart, a little closer together than the pattern calls for the larger buttons.
The vest is a recently completed knitting project, something quick from leftover yarn. I thought I would have to make a top to wear with this skirt, but it turns out that my hand-knitted sweaters all look great with this skirt.